Get Started with Chef Habitat
This getting started guide will show you how to use Chef Habitat to build and deploy a Node.js application.
Prerequisites
Before getting started with this tutorial, you will need:
- a workstation running Linux or macOS
- a GitHub account
- Docker Desktop installed locally (optional)
- the Chef Habitat CLI installed locally
- an account on Chef Habitat Builder
- a profile on your Builder account
Create an origin and set up the Habitat CLI
If you don’t already have one, create an origin in your Chef Habitat Builder account. This origin will store the Habitat package that you create in this tutorial.
If you haven’t already done so, run
hab cli setupand follow the instructions. This will configure the Hab CLI to work with your origin on the Habitat Builder SaaS.You will need to provide the origin you created in your Builder account and a personal access token, which you can generate in your Profile page in Habitat Builder.
Fork and Clone the Habitat sample-node-app repository
Create a fork of the sample-node-app GitHub repository in your own GitHub account.
Clone the fork onto your local workstation.
Edit the Plan File
The plan file instructs Chef Habitat in how to build, deploy, and manage your application.
Edit the plan file to use your origin:
- Open the
sample-node-app/habitat/plan.shfile with your editor of choice. - Update the value of
pkg_originwith the name of the origin in your Habitat Builder account.
Note the pkg_deps setting. This lists dependencies that your package requires at runtime. This Node.js application requires the core/node package, which is maintained by the Habitat Core maintainers. You can see a full list of core packages in the core-plans repository, or by searching for core in Habitat Builder.
See the plan settings documentation for more information about the settings in a plan file.
See the plan writing documentation for more information defining dependencies.
Run the Service in the Habitat Studio
The Chef Habitat Studio is a clean, self-contained, minimal environment in which you can develop, build, and package software that is free from any upstream operating system distribution. All tools and dependencies included in the Studio are installed through Chef Habitat packages, thus preventing any unwanted dependencies from being used by your package.Use the Habitat Studio to generate a Habitat package and preview the running Node.js app:
In a terminal, switch to the root of the
sample-node-appdirectory.If you’re using Docker, expose port 8000 so you can preview the application in a browser.
To expose port 8000, run:
export HAB_DOCKER_OPTS="-p 8000:8000"Enter the Habitat Studio.
On macOS run:
hab studio enterOn Linux run:
hab studio enter -DNow build the package.
buildThe Studio will generate a package (a
.hartfile) and place it in theresultsdirectory. You will also find alast_build.envfile in theresultsdirectory that has metadata about the last package build.Start the service.
hab svc load ORIGIN_NAME/sample-node-appVerify that the service is running in the Habitat Studio.
hab svc statusThis should return a status similar to:
package                                           type        desired  state  elapsed (s)  pid   group
ORIGIN_NAME/sample-node-app/1.1.0/20221018162840  standalone  up       up     58           3047  sample-node-app.default
Now you can navigate to localhost:8000 in your browser to see the running service.
Shut Down the Service
Stop the service.
hab svc stop ORIGIN_NAME/sample-node-appVerify that the service has stopped running.
hab svc statusAnd exit the Studio.
exit
Manage the Service with Habitat Builder
Chef Habitat Builder acts as the core of Chef’s Application Delivery Enterprise hub. The Chef Habitat Builder SaaS stores plan files where they can be viewed and accessed by the Chef Habitat community and then deployed by the Chef Habitat Supervisor.
Add your package to your Builder origin and then connect that package to your clone of the sample-node-app repository. Any changes made to your clone of the sample-node-app will trigger the Chef Habitat Builder to rebuild the package.
If you haven’t already done so, commit the changes you made earlier to the
plan.shfile into the default branch of your clone of the sample-node-app repository, and push those changes up to your fork on GitHub.The
pkg_originsetting in theplan.shfile should be set to your origin.Log in to your account in Chef Habitat Builder and select your origin.
Create a new package by selecting Create Package.
The name of the package you create must match the package name defined by the
pkg_namesetting in theplan.shfile.Connect the plan file to the new package by selecting Connect a plan file and then for Linux (kernel version 3.2 or later).
Select your GitHub organization or user account under Organization, and then select sample-node-app under Repository.
Select Save Connection at the bottom of the page.
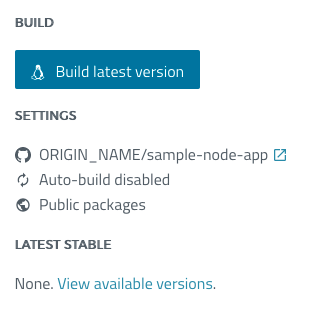
Once the plan is connected, select Latest towards the top of the page and build the package by selecting Build latest version on the right side of the page.
Select View the output and then the View build job button ( ) to watch the service building in Habitat Builder.
After Habitat Builder finishes building the service, select the Latest tab, and then select Promote to promote the service to the stable channel.
Run the Service From Habitat Builder in the Habitat Studio
Now that the Node.js app is under management by the Chef Habitat Builder, you can update the service from Habitat Builder.
From a local terminal, enter the Habitat Studio.
hab studio enterVerify that a service is not running in the Studio.
hab svc statusLoad the service into the Studio using the at-once update strategy.
The at-once update strategy will pull down the package from Habitat Builder whenever it detects that a new version has been released.
hab svc load ORIGIN_NAME/sample-node-app --strategy at-onceNow monitor the Habitat Supervisor to watch it update when a new version of the package is created.
sup-logThis will show you a streaming log of the Habitat Supervisor output.
Back in the Habitat Builder web UI, rebuild the service by selecting Build latest version again.
When Habitat Builder finishes creating a new build of the service, select the Versions tab, then select the version of the sample-node-app (1.1.0), and then select Promote to stable next to the newest build of the service.
In your local terminal, the Supervisor log will show your package updating in the Habitat Studio.
See the Supervisor Log Codes documentation for an explanation of the different Supervisor log codes.
Rebuild the Service From Your GitHub Repository
From here you can try updating the service by making a change to the sample-node-app repository.
In your local clone of the sample-node-app repository, update the
pkg_versionto1.2.0in theplan.shfile.You might also try updating the message in
habitat/config/config.jsonto something like:Hello friend. This is version {{ pkg.version }} of the Habitat Node.js sample app.Commit the change into the default branch of the sample-node-app repository and push the commit up to your fork of sample-node-app.
If your terminal is still running the Supervisor log, continue to the next step. Otherwise, rerun the steps to load the service and view the Supervisor log.
Expose port 8000.
export HAB_DOCKER_OPTS="-p 8000:8000"Enter the Studio and load the service using the at-once update strategy.
hab studio enter
hab svc load ORIGIN_NAME/sample-node-app --strategy at-once
View the Supervisor log.
sup-log
In Habitat Builder, select Build latest version of your package again, then View the output, and select the View build job button ( ).
Note
If you get an error after selecting Build latest version, wait a few minutes and try again. It can take Builder a few minutes to update after changes are made in a GitHub repository.After Habitat Builder has finished building the new version of your package, select the Versions tab, select the 1.2.0 row, and then select Promote to stable and Yes, promote it.
The Supervisor should show a log in your terminal of the package updating to the latest version. After the Supervisor is done updating the service, navigate to localhost:8000 in your browser and the webpage should show the updated version number and text.