Data Feeds
The Data Feed service sends node data to a 3rd party service. This can be useful when updating configuration management databases, external security dashboards, and IT service management platforms. The following types of information are sent:
- Ohai data gathered from each managed node - This data includes hardware, operating system, and installed program information. Some variation depends on the managed operating system.
- Configuration information about each managed node - This information includes Chef Client run status, run lists, cookbooks, and recipes running against each node.
- Compliance information about each node that shows the compliance state - This information includes passed and failed controls for each profile executed against that node.
A Data Feed operates by doing the following:
- Every 4 hours, the data-feed-service will aggregate the client runs and compliance reports from the previous 4 hours and send this information to the registered destinations. This time interval is 4 hours by default but is configurable.
- If there are no destinations, the aggregation won’t occur.
- The data aggregates and sends in batches of 50 nodes at a time. The batch amount is 50 by default but is configurable.
By default, only Admin users of Chef Automate may create and manage Data Feeds.
Note
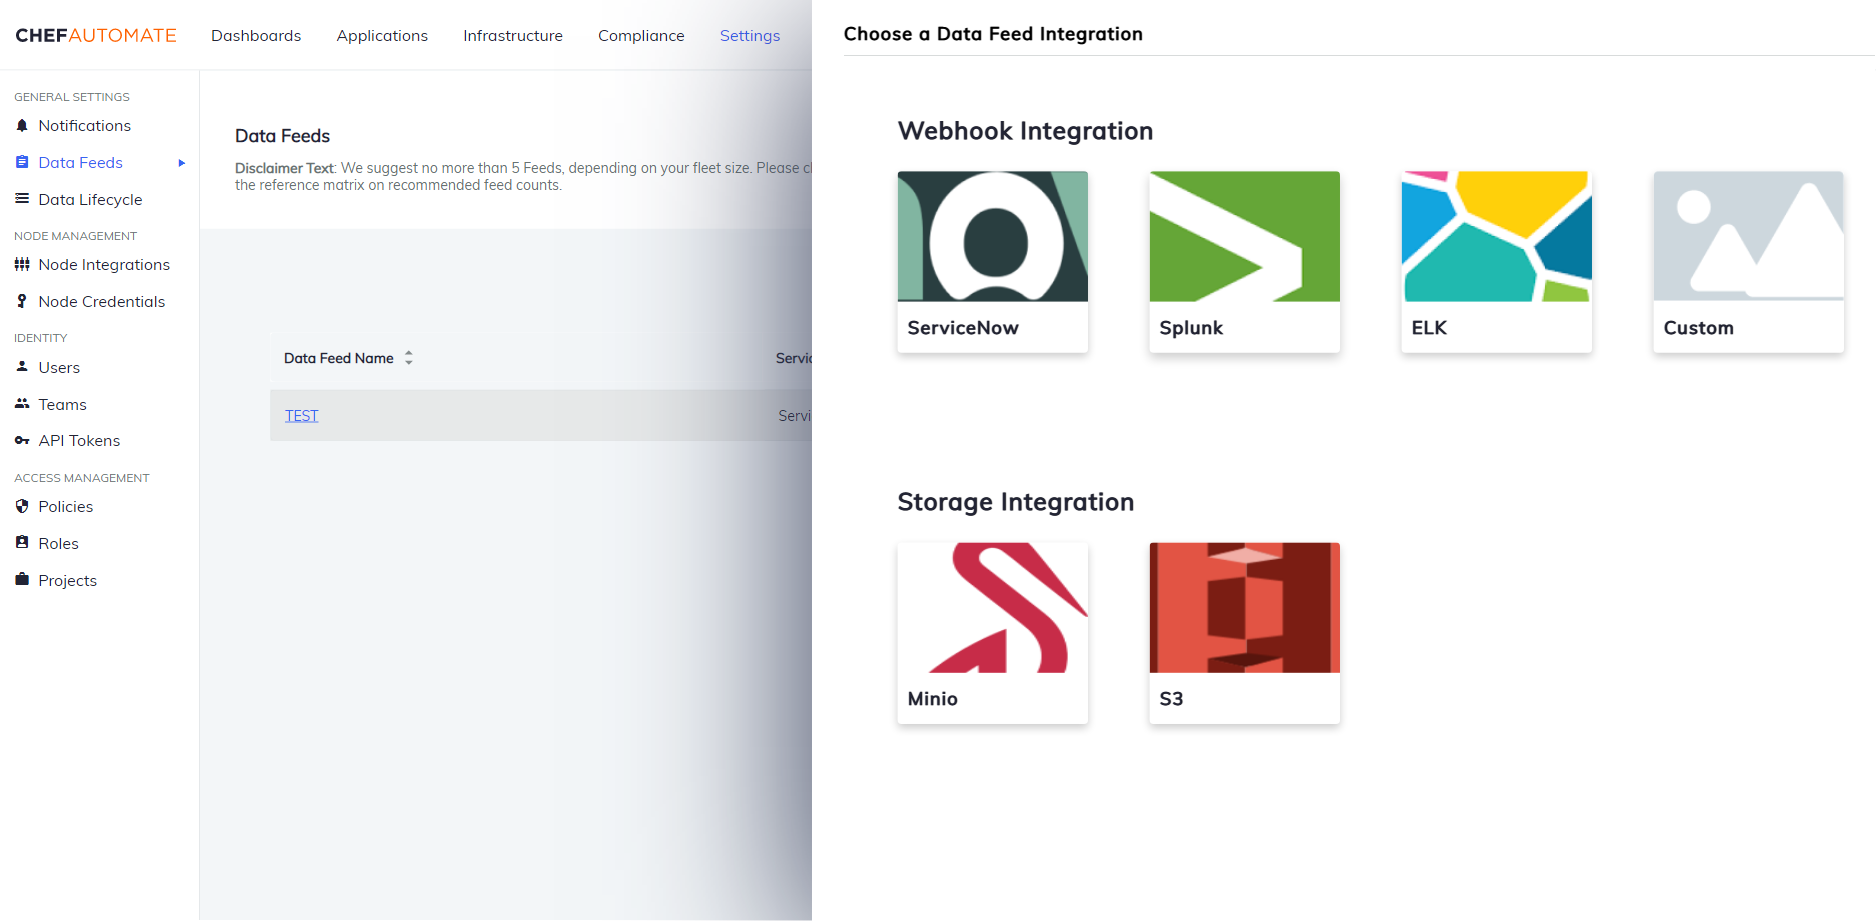
Data Feed Integration
Data Feed instance sends client run and compliance scan data to the 3rd party integrations available. To add a Data Feed instance in Chef Automate:
- In the Settings tab, navigate to Data Feeds in the sidebar
- Select New Integration
Currently, the data feed has two types of integrations:
- Webhook Integration
- ServiceNow
- Splunk
- ELK
- Custom
- Storage Integration
- MinIO
- Amazon S3
Webhook Integration
Create a data feed using a webhook integration.
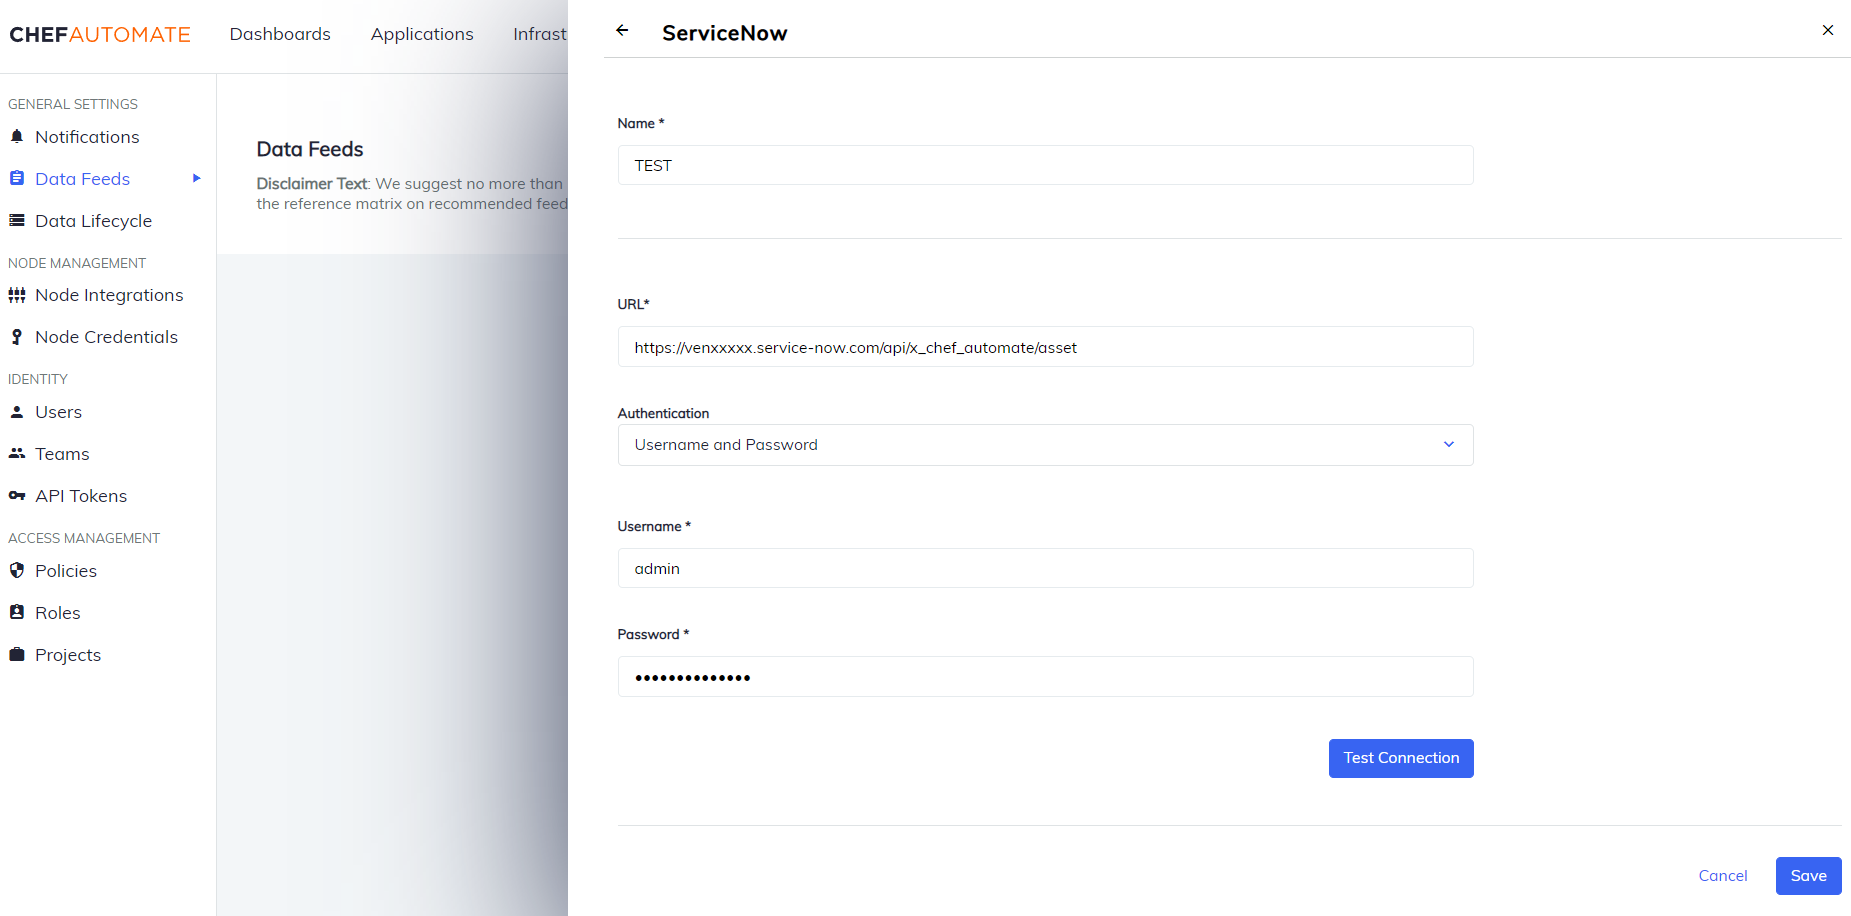
ServiceNow
To create a data feed select ServiceNow from Settings > Data Feed > New Integration.
Data Feed Name: A unique name for this notification.
URL: The endpoint for the data feed integration, including any specific port details.
Authentication: Select an authentication method.
- Username and Password
- Username: The name you use to sign in to ServiceNow.
- Password: The password you use to sign in to ServiceNow.
- Access Token:
- Token Type: The prefix for the authorization used to access ServiceNow endpoints.
- Token: The authorization token value used to access ServiceNow endpoints.
- Username and Password
Select Test Connection to start validating the connection details.
Once the test is successful, select Save to save the Data Feed configuration.
Edit a ServiceNow Data Feed Instance
To edit a Data Feed instance of ServiceNow Integration:
- Select the data feed instance name to open its detail page.
- Edit the Data Feed Name or URL.
- Select the Test Data Feed button to test the URL.
- Select Save to save your changes.
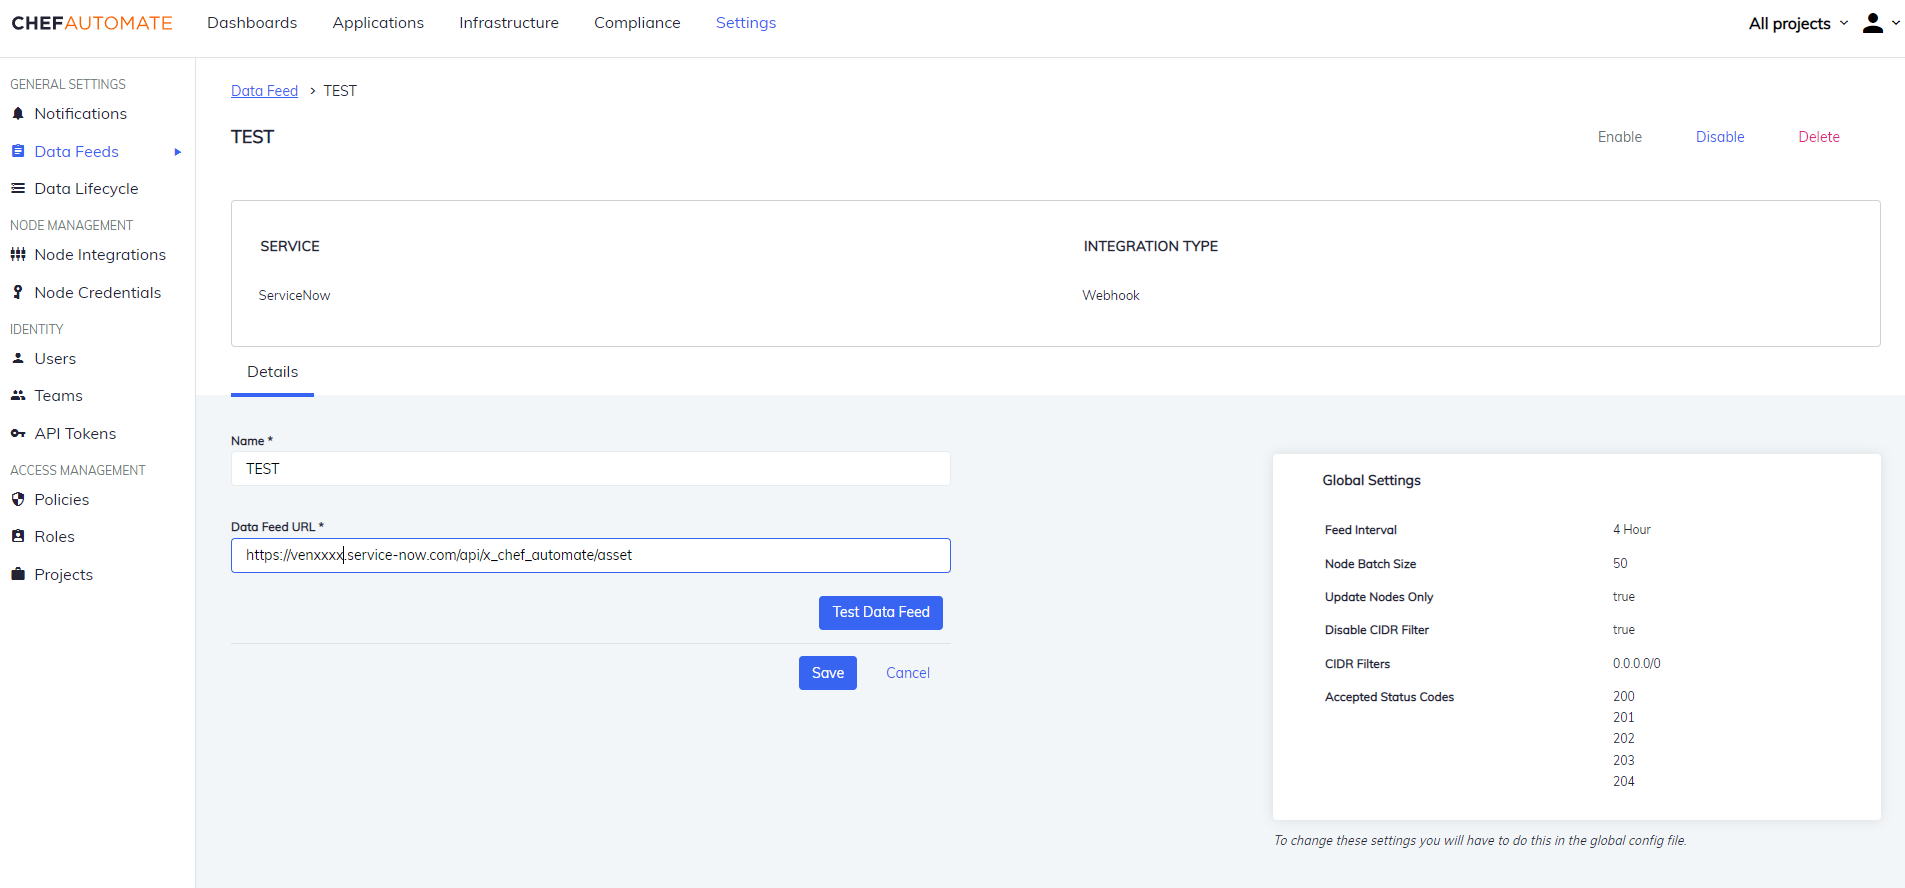
You can also Enable/Disable, and Delete the instance from the buttons provided on the details page.
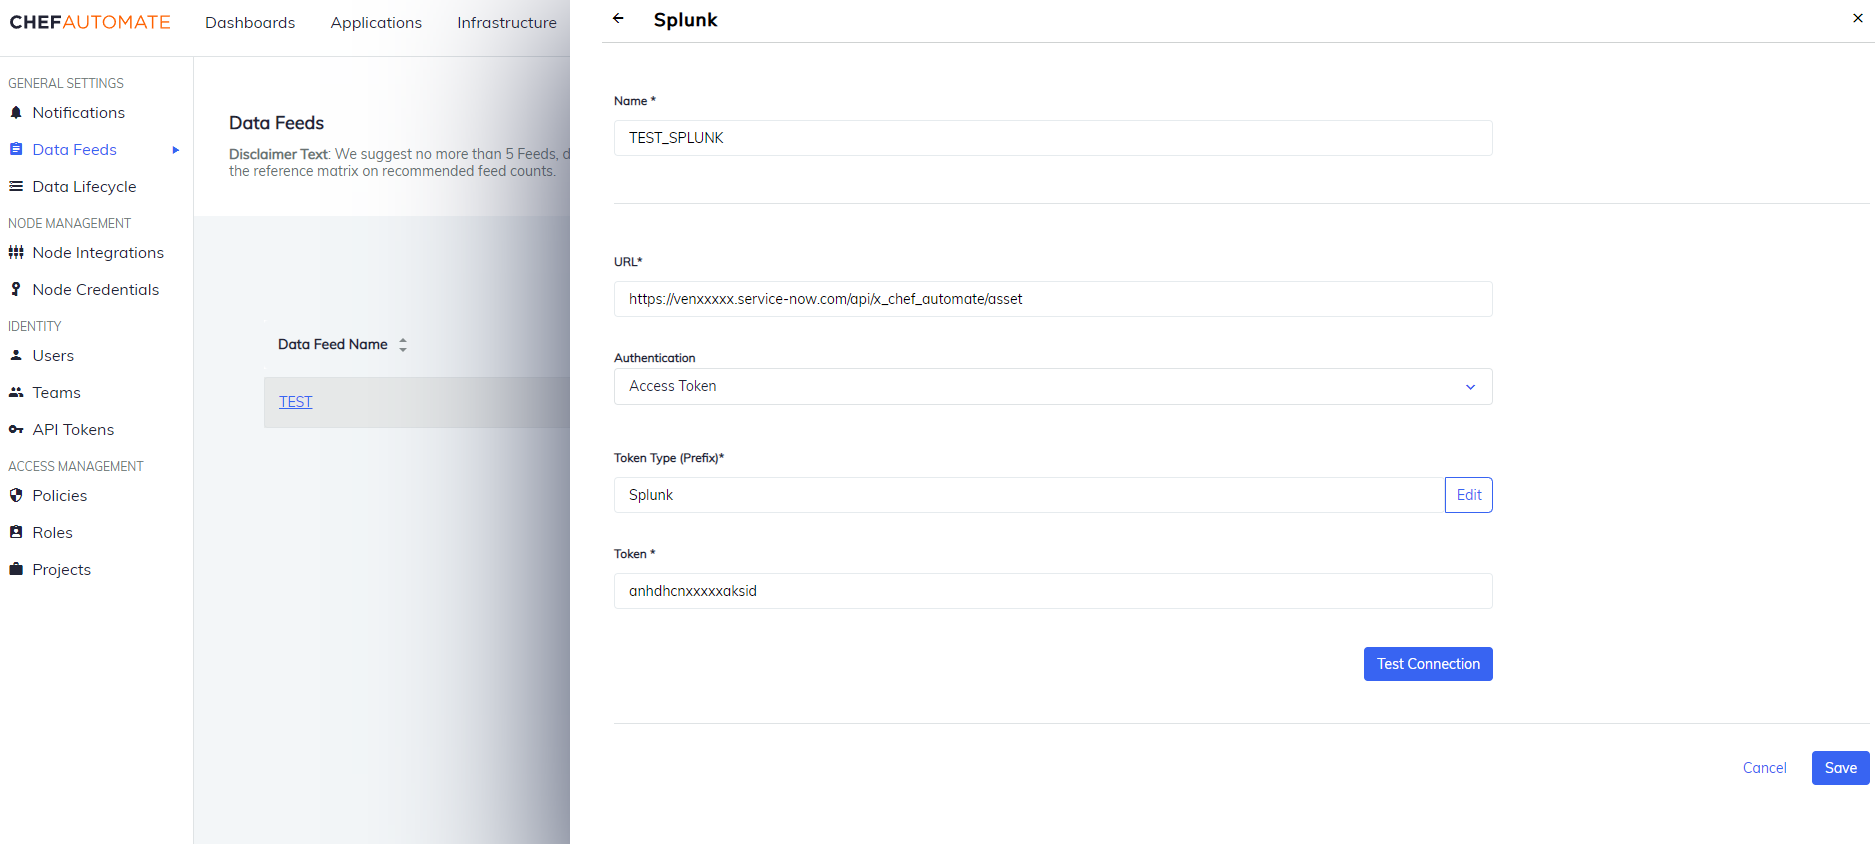
Splunk
To create a data feed select Splunk from Settings > Data Feed > New Integration.
Data Feed Name: A unique name for this notification.
URL: The endpoint for the data feed integration, including any specific port details.
Authentication: Select an authentication method.
- Username and Password
- Username: The name you use to sign in to Splunk.
- Password: The password you use to sign in to Splunk.
- Access Token:
- Token Type: The prefix for the authorization used to access Splunk endpoints.
- Token: The authorization token value used to access Splunk endpoints.
- Username and Password
Select Test Connection to start validating the connection details.
Once the test is successful, select Save to save the Data Feed configuration.
Edit a Splunk Data Feed Instance
To edit a Data Feed instance of Splunk Integration:
- Select the data feed instance name to open its detail page.
- Edit the Data Feed Name or URL.
- Select the Test Data Feed button to test the URL.
- Select Save to save your changes.
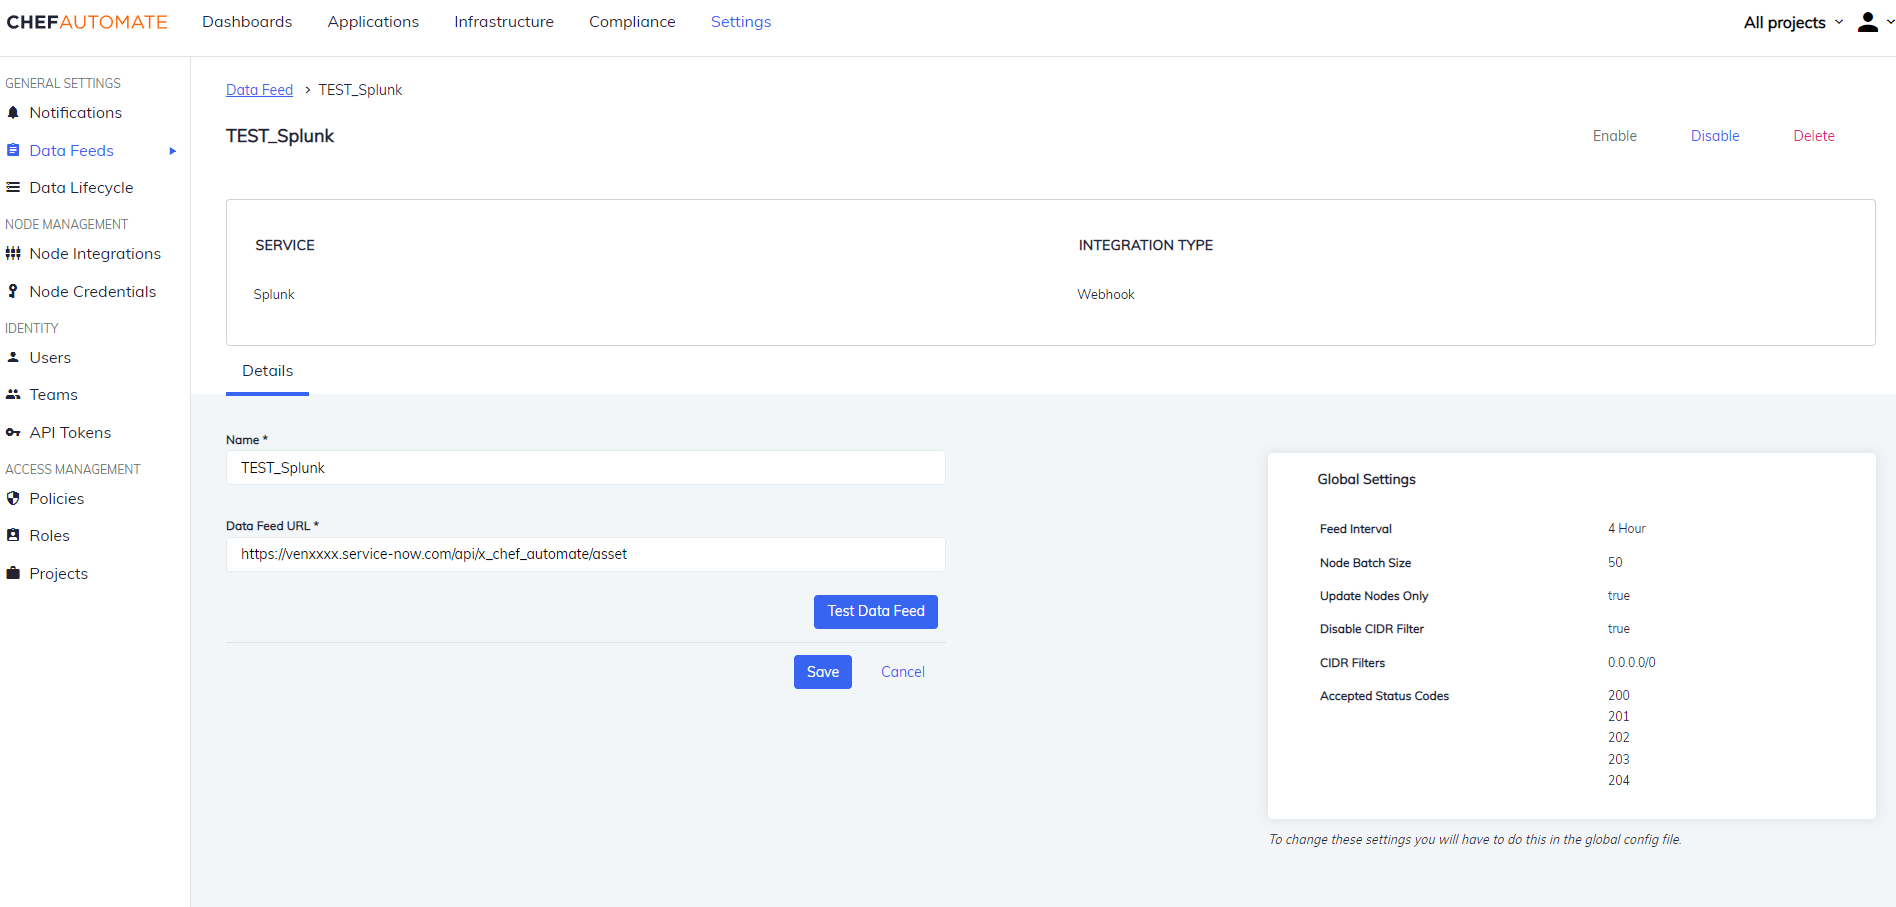
You can also Enable/Disable, and Delete the instance from the buttons provided on the details page.
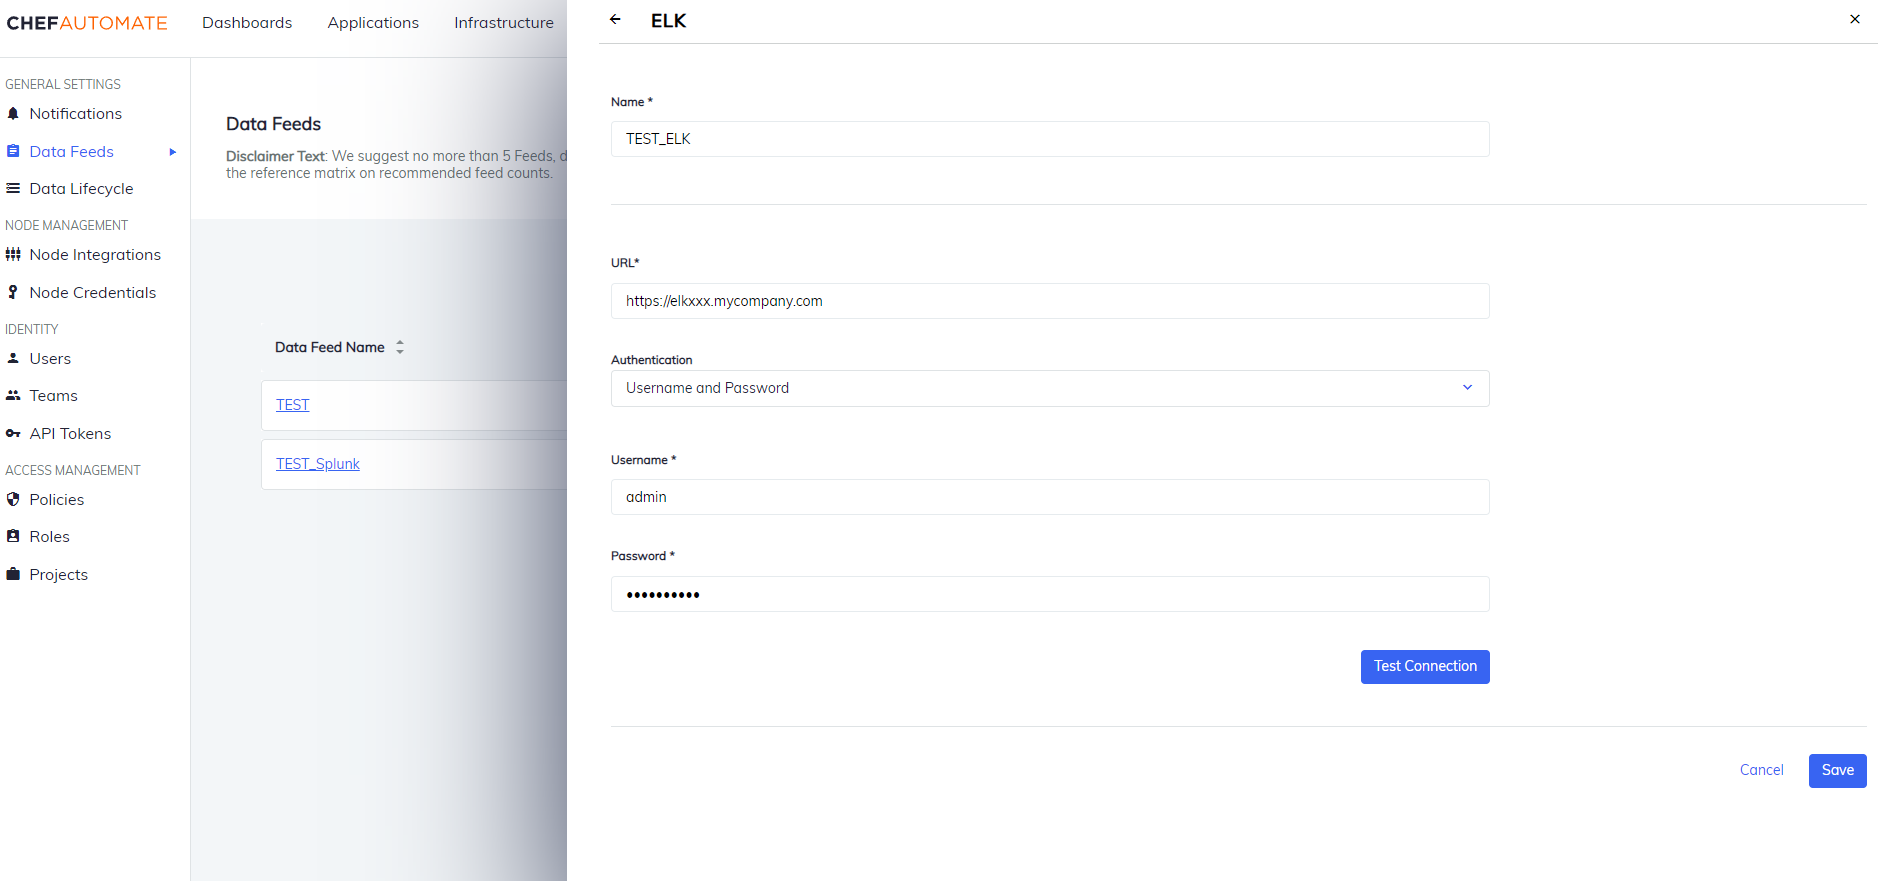
ELK
To create a data feed select ELK from Settings > Data Feed > New Integration.
Data Feed Name: A unique name for this notification.
URL: The endpoint for the data feed integration, including any specific port details.
Authentication: Select an authentication method.
- Username and Password
- Username: The name you use to sign in to ELK.
- Password: The password you use to sign in to ELK.
- Access Token:
- Token Type: The prefix for the authorization used to access ELK endpoints.
- Token: The authorization token value used to access ELK endpoints.
- Username and Password
Select Test Connection to start validating the connection details.
Once the test is successful, select Save to save the Data Feed configuration.
Edit an ELK Data Feed Instance
To edit a Data Feed instance of ELK Integration:
- Select the data feed instance name to open its detail page.
- Edit the Data Feed Name or URL.
- Select the Test Data Feed button to test the URL.
- Select Save to save your changes.
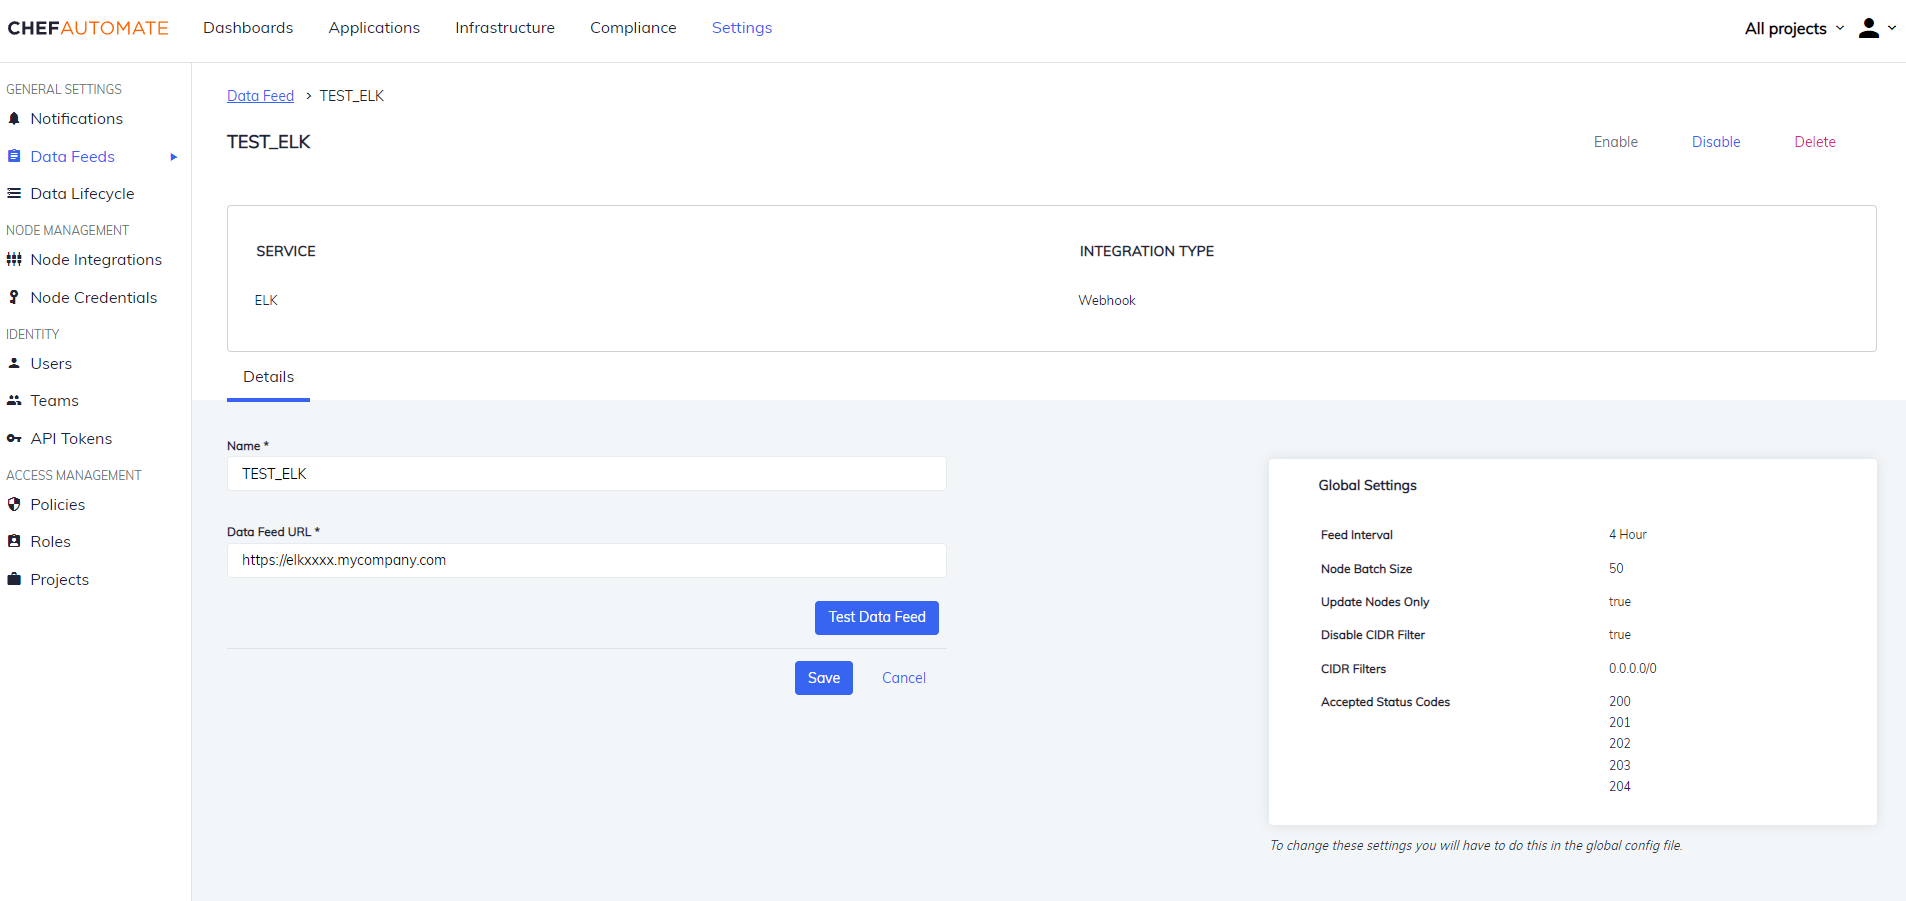
You can also Enable/Disable, and Delete the instance from the buttons provided on the details page.
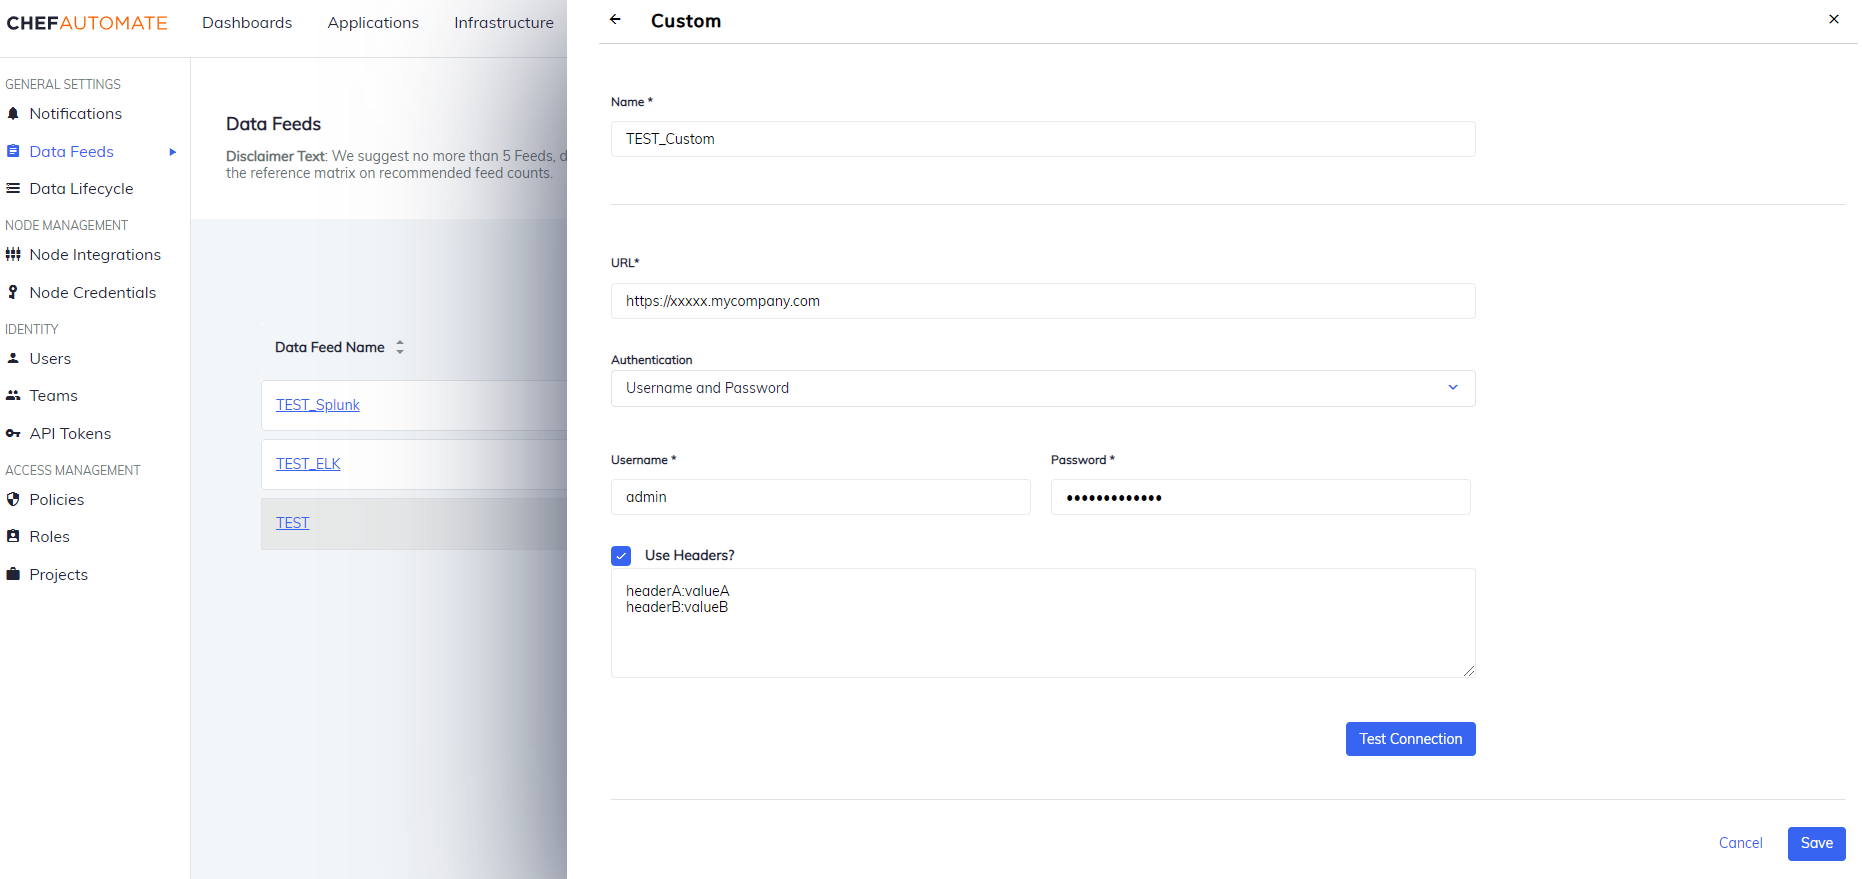
Custom
To create a data feed select Custom from Settings > Data Feed > New Integration.
Data Feed Name: A unique name for this notification.
URL: The endpoint for the data feed integration, including any specific port details.
Authentication: Select an authentication method.
- Username and Password
- Username: The name you use to sign in to Custom Integration.
- Password: The password you use to sign in to Custom Integration.
- Access Token:
- Token Type: The prefix for the authorization used to access Custom Integration endpoints.
- Token: The authorization token value used to access Custom Integration endpoints.
- Username and Password
Select Use Headers checkbox to add custom headers (For example:
key:value).Select Test Connection to start validating the connection details.
Once the test is successful, select Save to save the Data Feed configuration.
Edit a Custom Data Feed Instance
To edit a Data Feed instance of Custom Integration:
- Select the data feed instance name to open its detail page.
- Edit the Data Feed Name or URL.
- Select the Test Data Feed button to test the URL.
- Select Save to save your changes.
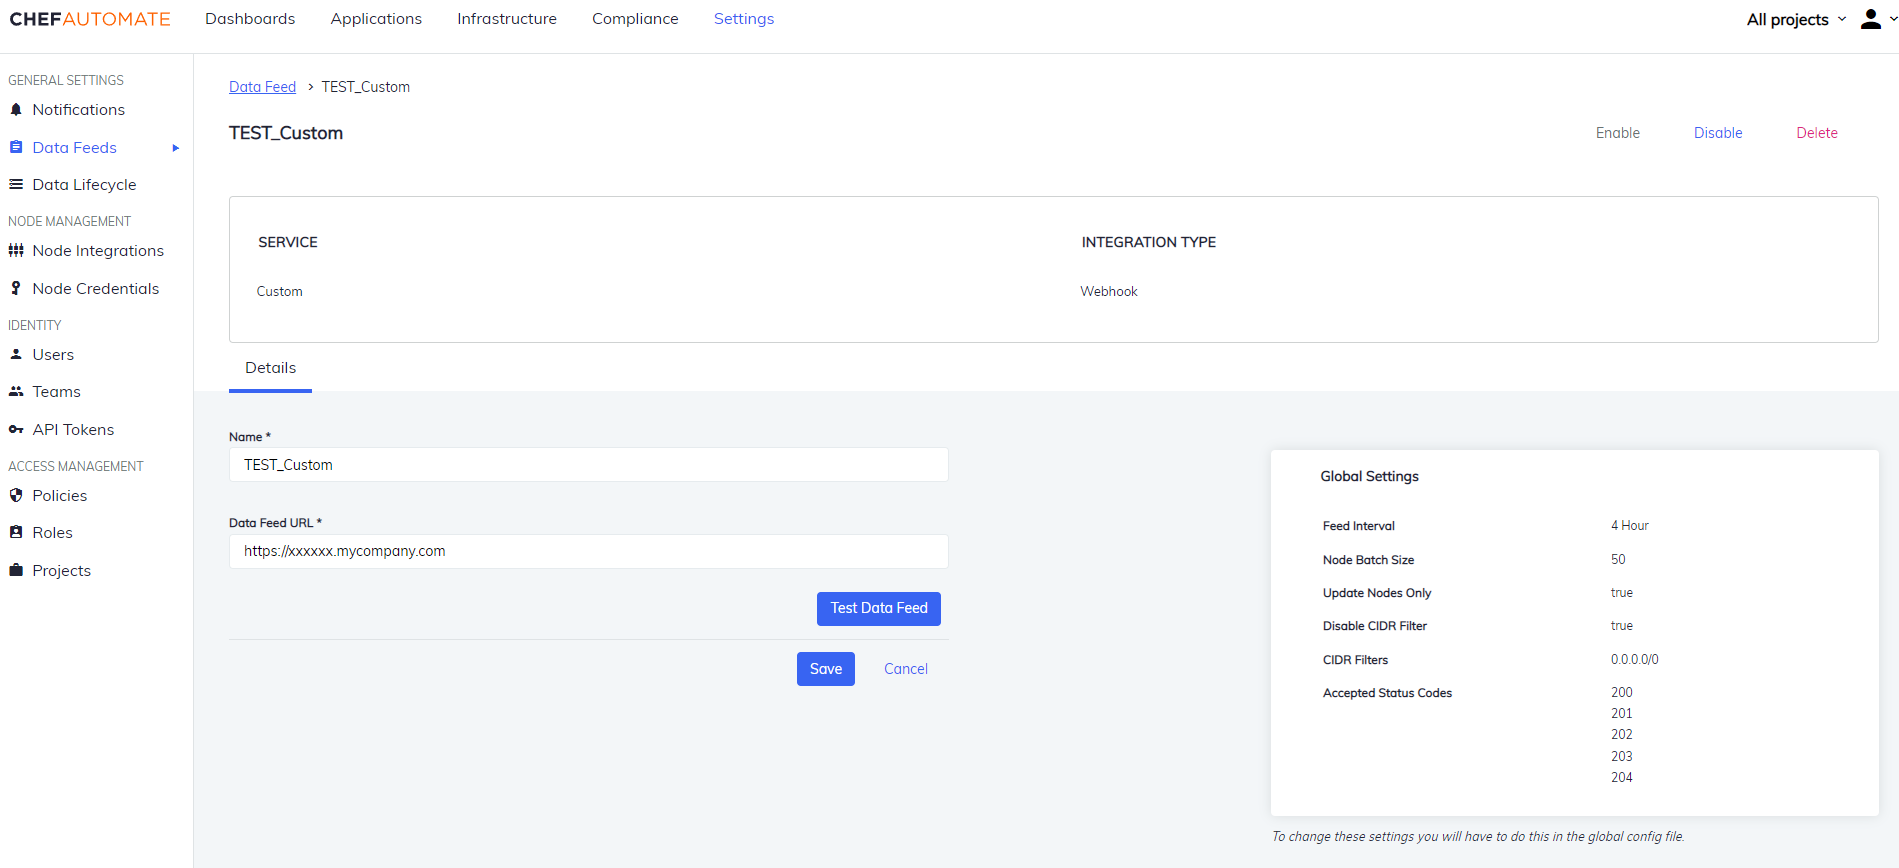
You can also Enable/Disable, and Delete the instance from the buttons provided on the details page.
Storage Integration
Create a data feed using a storage integration.
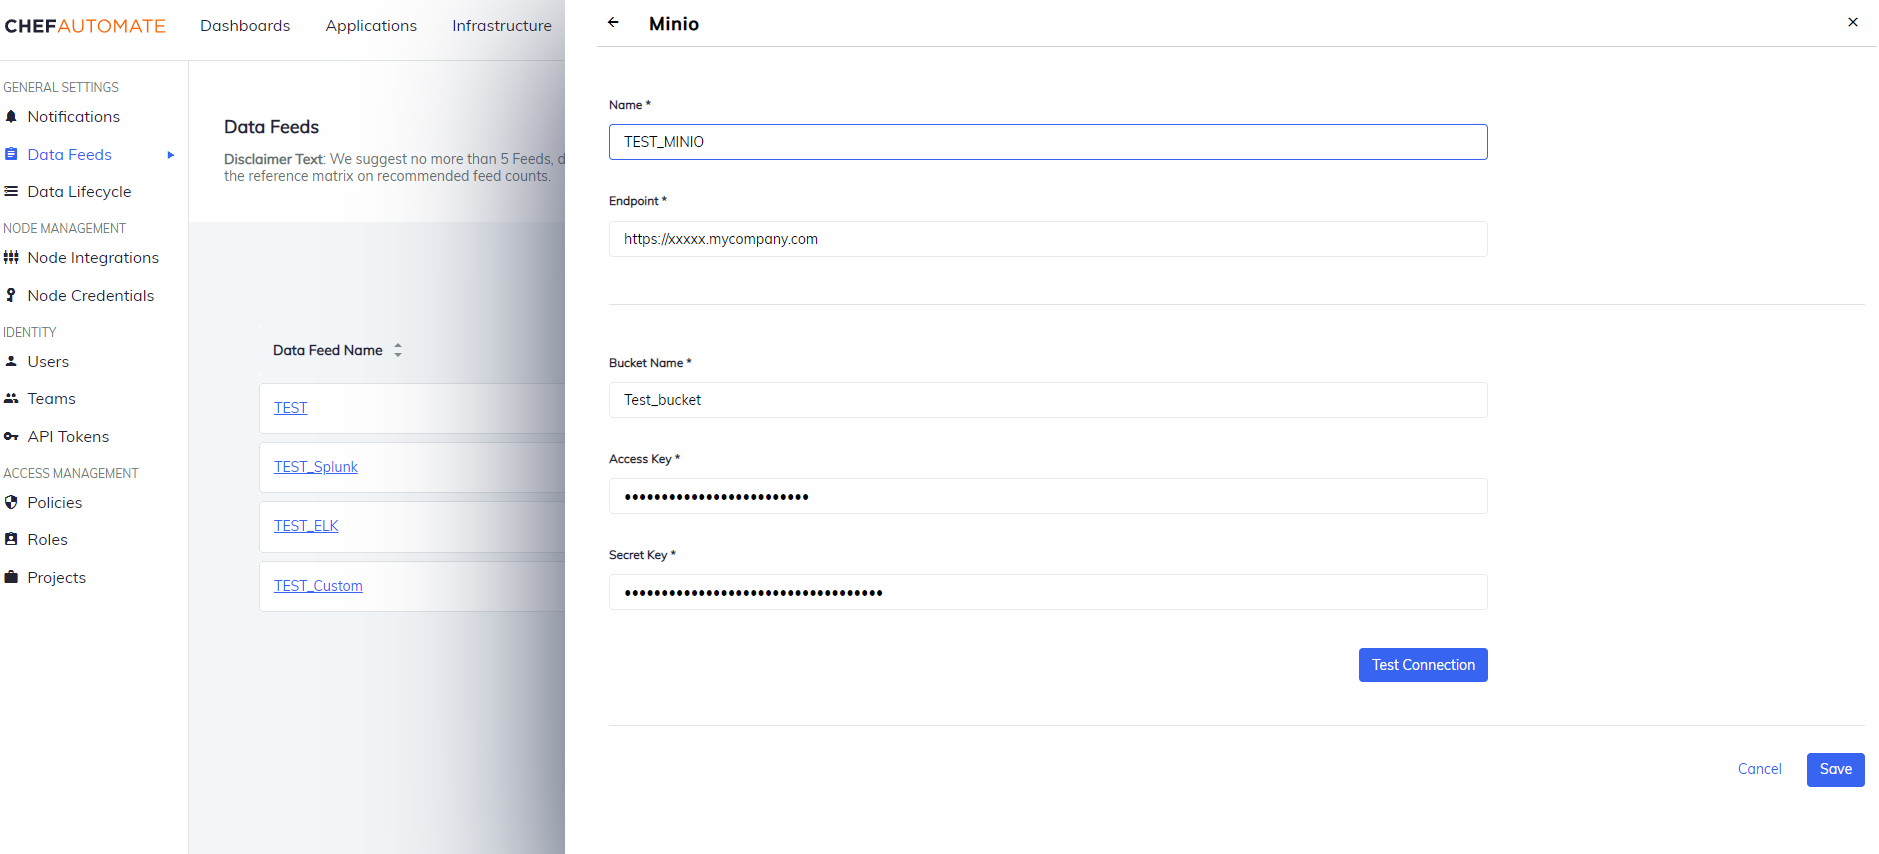
MinIO
To create a data feed select MinIO from Settings > Data Feed > New Integration.
- Data Feed Name: A unique name for this notification.
- Endpoint: The endpoint for the data feed integration, including any specific port details.
- Enter a Bucket Name, Access Key, and the Secret Key of the instance.
- Select Test Connection to start validating the connection details.
- Once the test is successful, select Save to save the Data Feed configuration.
Edit a MinIO Data Feed Instance
To edit a Data Feed instance of MinIO Integration:
- Select the data feed instance name to open its detail page.
- Edit the Data Feed Name, End Point, or the Bucket.
- Select the Test Data Feed button to test the Endpoint.
- Select Save to save your changes.
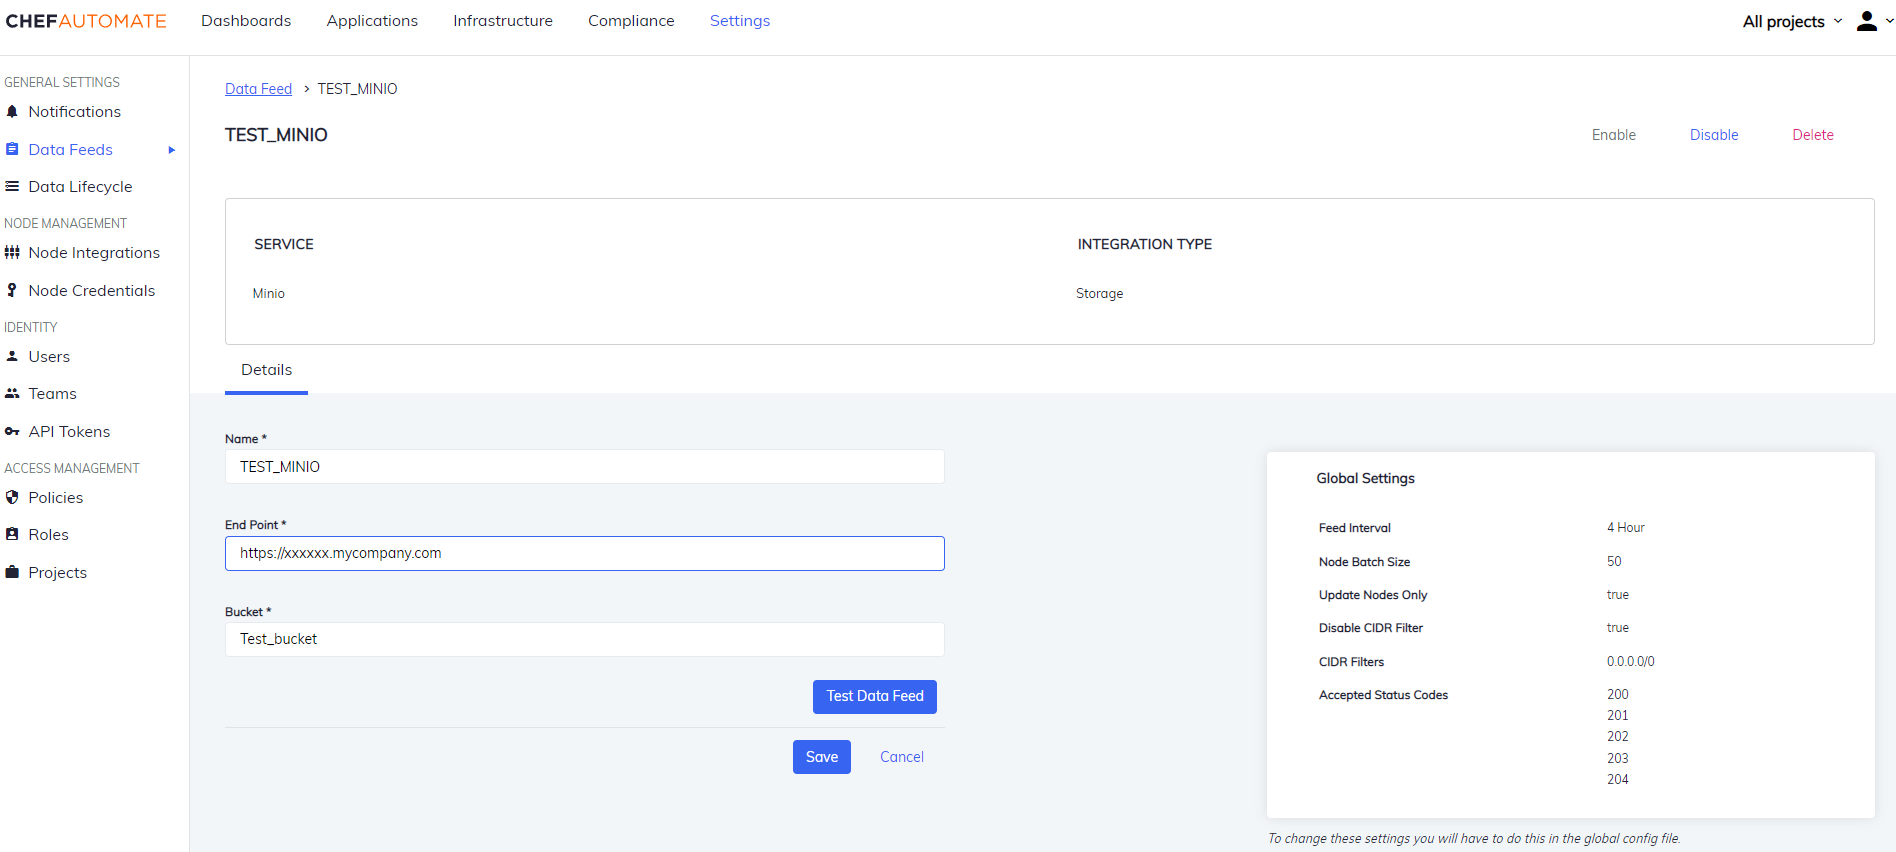
You can also Enable/Disable, and Delete the instance from the buttons provided on the details page.
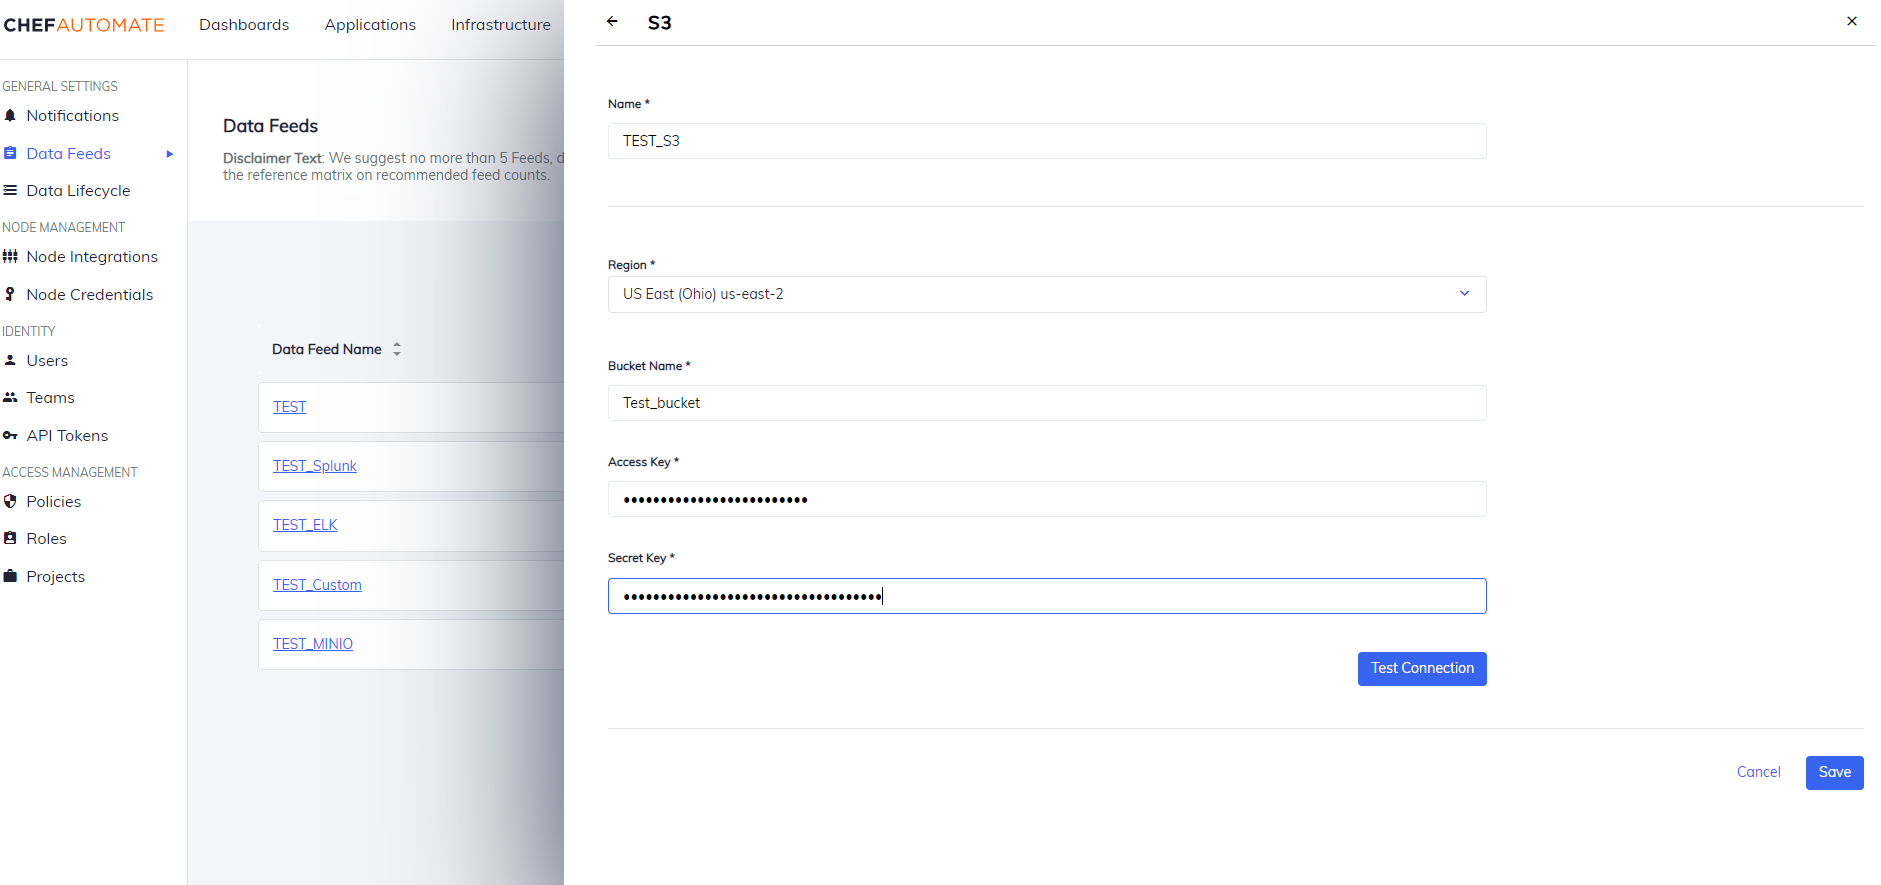
Amazon S3
To create a data feed select S3 from Settings > Data Feed > New Integration.
- Data Feed Name: A unique name for this notification.
- URL: The endpoint for the data feed integration, including any specific port details.
- Select your Region from the drop-down list.
- Enter a Bucket Name, Access Key, and the Secret Key of the instance.
- Select Test Connection to start validating the connection details.
- Once the test is successful, select Save to save the Data Feed configuration.
Edit an S3 Data Feed Instance
To edit a Data Feed instance of S3 Integration:
- Select the data feed instance name to open its detail page.
- Edit the Data Feed Name, Region or the Bucket.
- Select the Test Data Feed button to test the Endpoint.
- Select Save to save your changes.
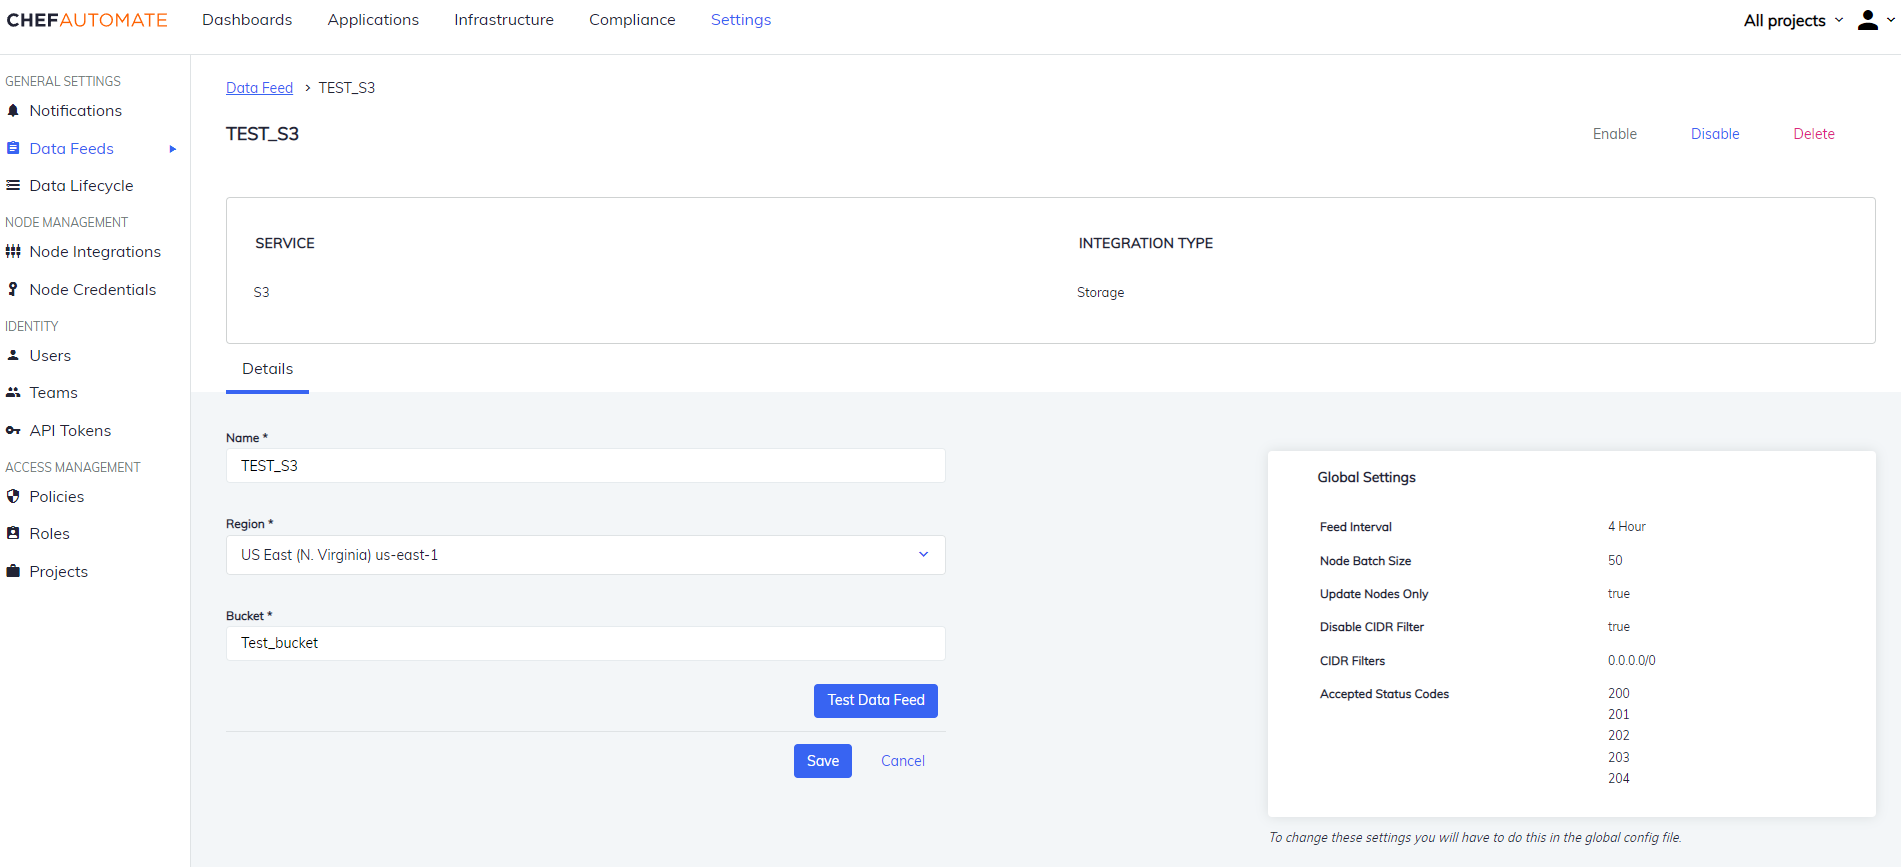
You can also Enable/Disable, and Delete the instance from the buttons provided on the details page.
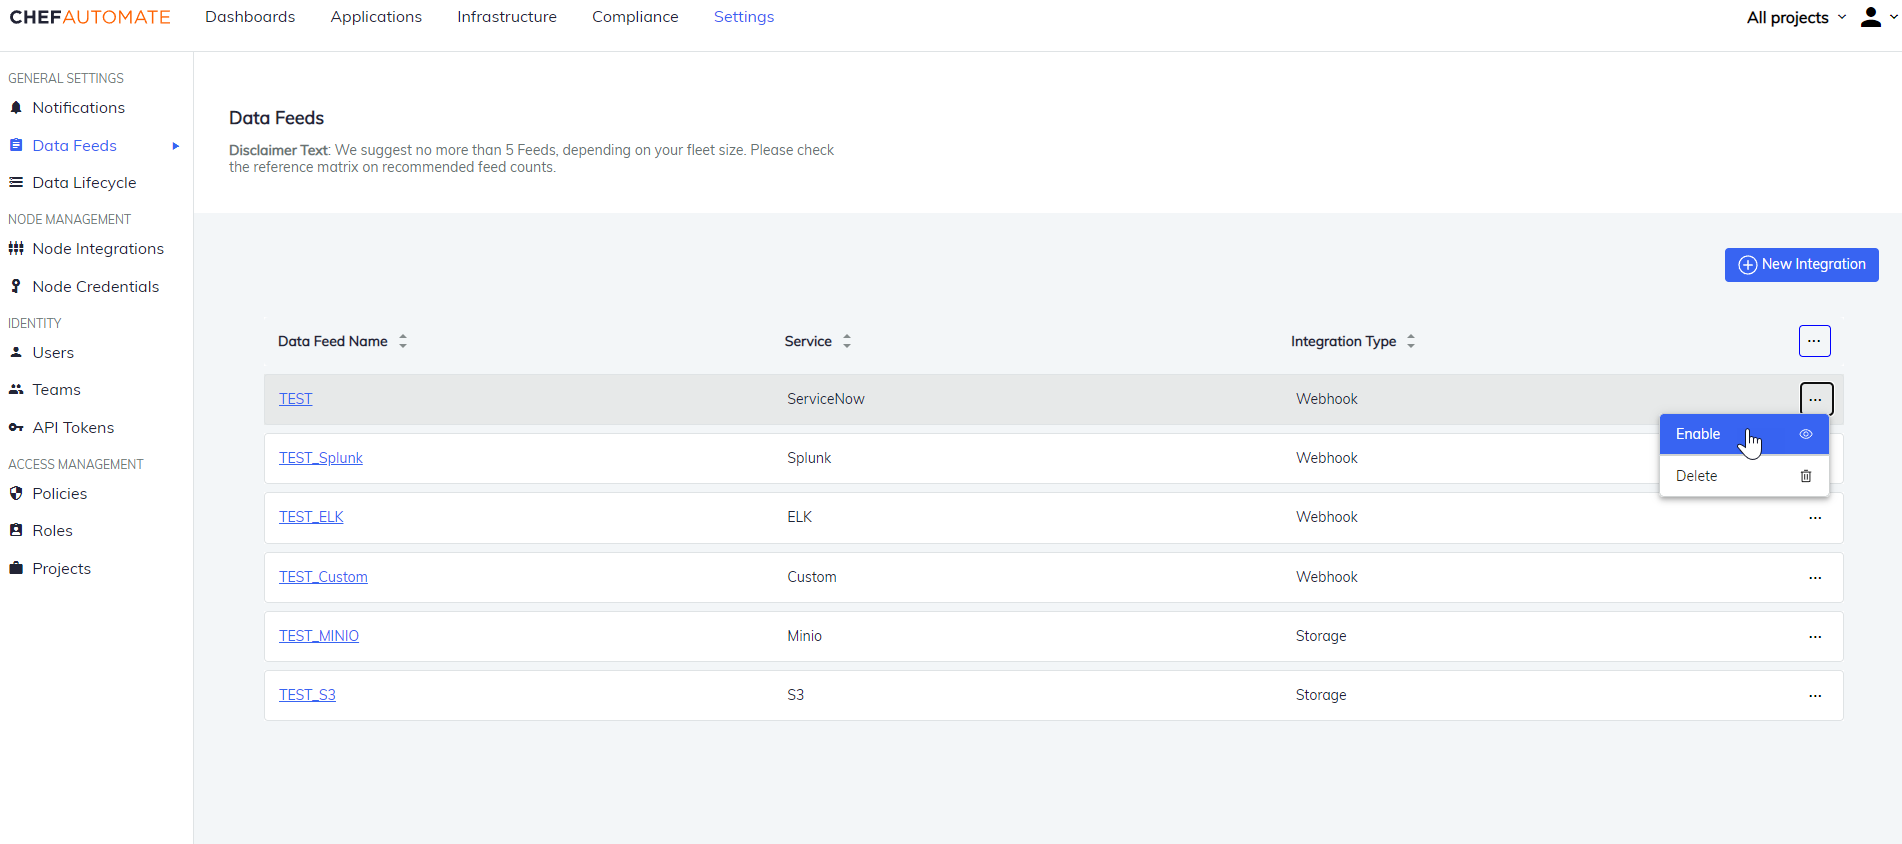
Enable/Disable a Data Feed Instance
Chef Automate lets you temporarily disable the data feed. It can be helpful if the data feed is going under maintenance or you don’t want to send the node or compliance data to a data feed.
The data feed instances are by default enabled when created. To disable a feed:
Select Disable from the top left corner of the details page. OR
Select the ellipses icon from the list of data feeds and select Disable.
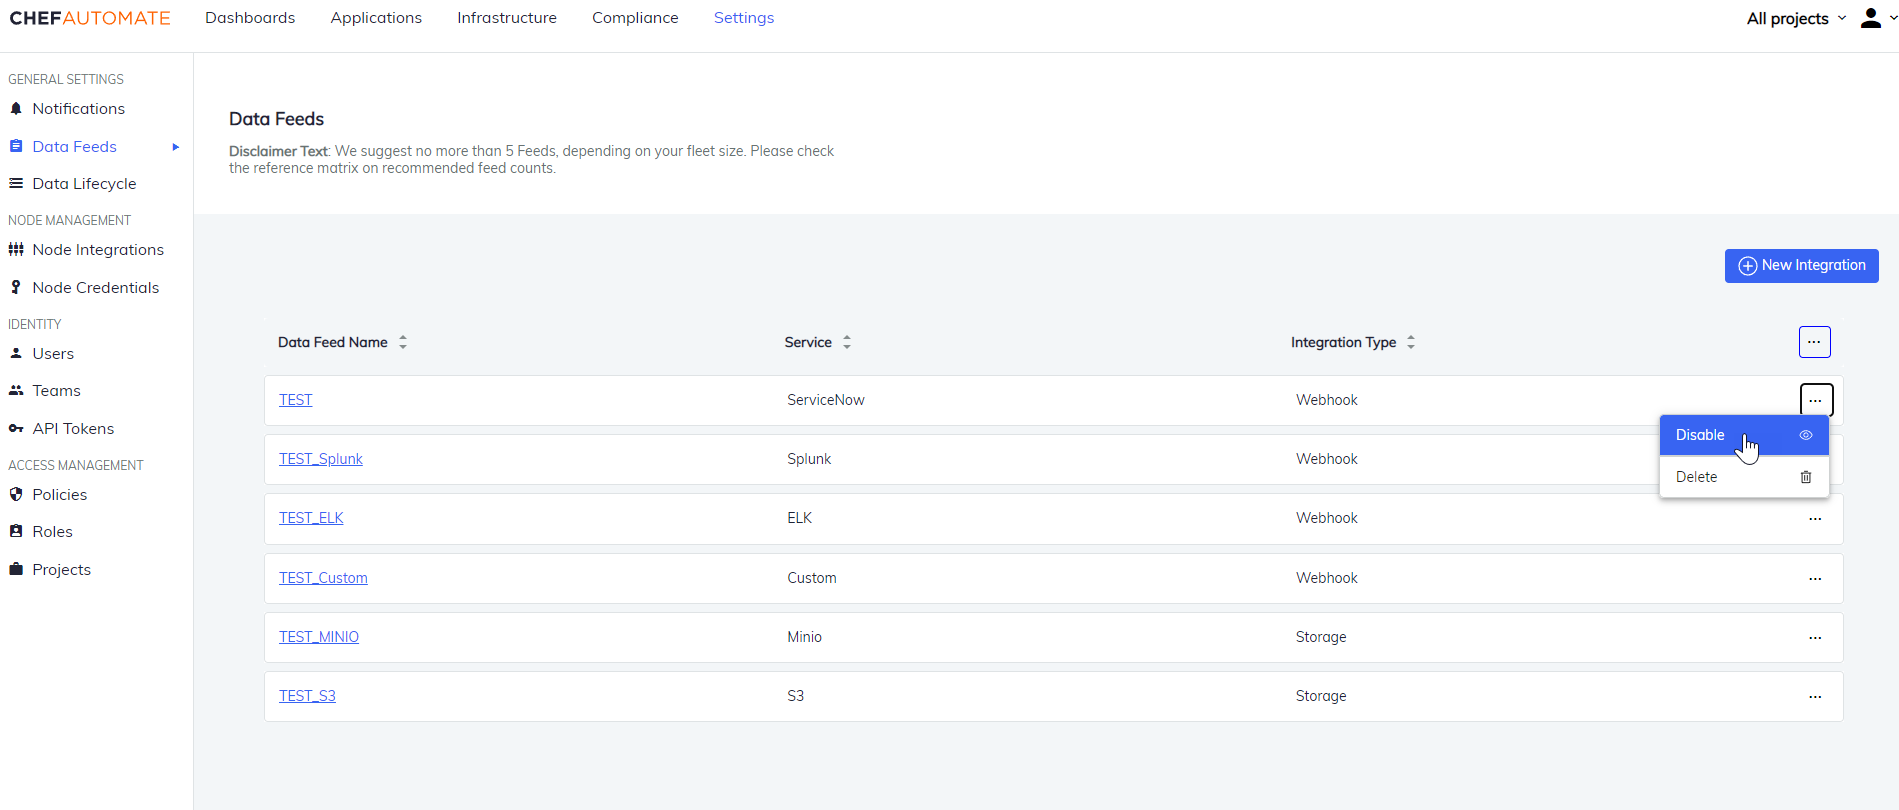
To enable a disabled data feed:
Select Enable from the top left corner of the details page. OR
Select the ellipses icon from the list of data feeds and select Enable.
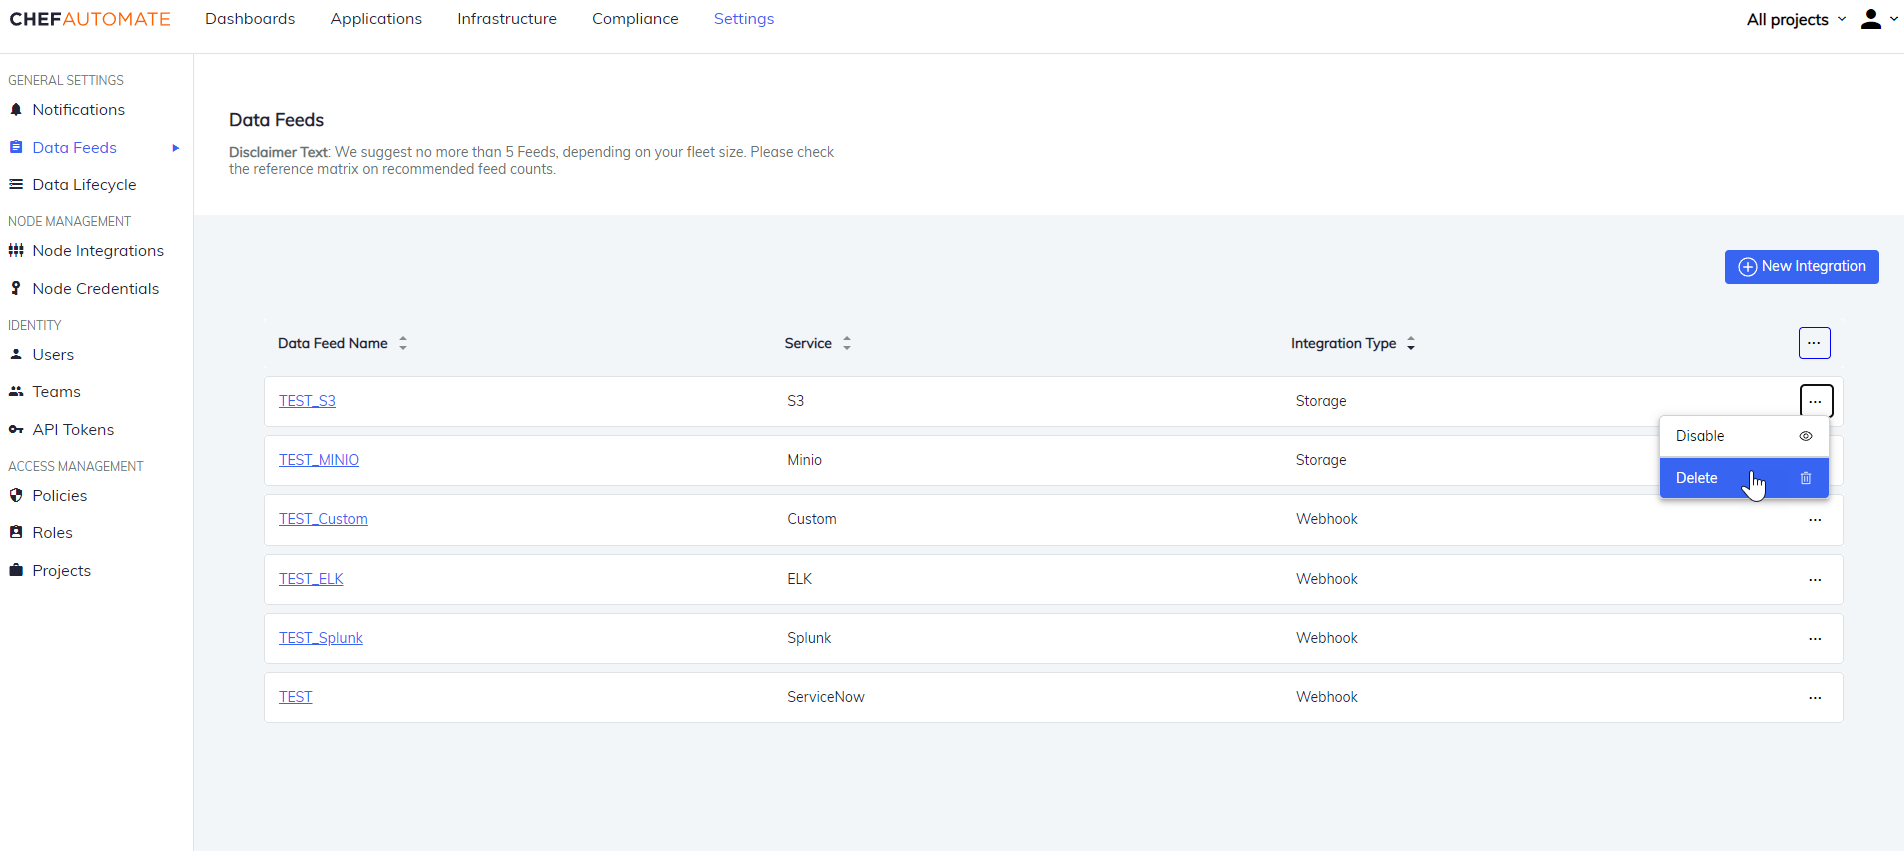
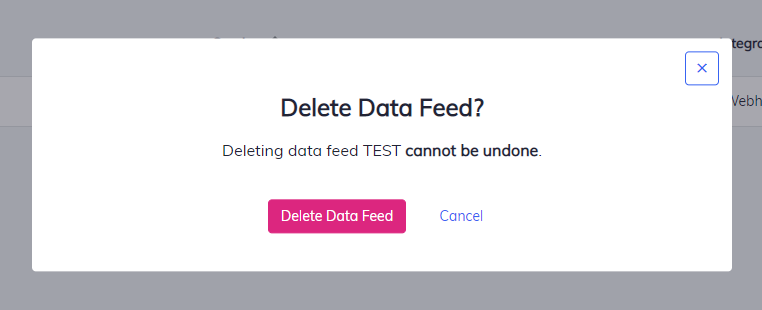
Delete a Data Feed Instance
To delete an individual instance:
- Select the ellipses icon .
- Select Delete.
- Select Delete Data Feed to confirm the action.
Configuring Global Data Feed Behavior
Note
To modify Data Feed behavior with the available configuration settings:
- Create a configuration patch file to update the configuration settings. Save this file in the
.tomlfile format and name your file as desired. For example,data-feed-patch.toml - Include one or more configuration settings and their updated values in your configuration patch
.tomlfile to reflect the desired global Data Feed behavior:- Use the
feed_intervalsetting to change the interval for the Data Feed collection. The default value is four hours - Use the
node_batch_sizesetting to change the number of sets of node data sent in each batch to your endpoint. The default value is 50 nodes - If automate receives only one kind of data (either client run or inspec scan) in a given period of time then we use the
updated_nodes_onlysetting to determine what data to include in each export. The default setting for this istrue. To determine if the client run and scan report that was received in automate belongs to the same node or not, we use theipaddressfield in the reports. If the client run and scan report both contain sameipaddressfield then we consider them belonging to same node. The explanation for the two possible scenarios where this setting is useful has been described below:- When in a given period of time for a particular node, only client run was received but compliance scan not received:
- If
updated_nodes_onlyis set to true:- Only the client run for that node will be sent to external integrations
- If
updated_nodes_onlyis set to false:- The client run for that node + the most recent compliance report for this node(queried by ipaddress) if there is any, will be sent to external integrations
- If
- When in a given period of time for a particular node, client run wasn’t received but only compliance scan was received:
- If
updated_nodes_onlyis set to true:- The compliance scan report for that node + basic node details like macaddress, hostname, ipaddress, fqdn (queried by ipaddress) will be sent to external integrations
- If
updated_nodes_onlyis set to false:- The compliance scan report for that node + all node data like attributes, last_run, macaddress, hostname, ipaddress, fqdn (queried by ipaddress) will be sent to external integrations
- If
- When in a given period of time for a particular node, only client run was received but compliance scan not received:
- To reduce the IP address range for the collected and processed node data, update the
disable_cidr_filtersetting tofalseand update thecidr_filtersetting to cover the required IP address range. For example, you may wish to send only production or test node traffic - Use the
accepted_status_codessetting to define an array of HTTP status codes that the Data Feed Service will treat assuccessif returned by the 3rd party endpoint. If the status code isn’t in theaccepted_status_codeslist, then an error will be logged
- Use the
- Save your configuration patch file changes before continuing to the next step.
- Apply your configuration changes with the Chef Automate command-line tool:
chef-automate config patch data-feed-patch.toml
where data-feed-patch.toml is this example’s configuration patch file.
Configuration Patch File Example
[data_feed_service.v1.sys]
  [data_feed_service.v1.sys.service]
        feed_interval = "4h"
        node_batch_size = 50
        updated_nodes_only = true
        disable_cidr_filter = true
        cidr_filter = "0.0.0.0/0"
        accepted_status_codes = [200, 201, 202, 203, 204]
      [data_feed_service.v1.sys.log]
        level = "info"
To debug any issues with the Data Feed Service in Chef Automate, update the following section in your configuration patch file by changing the log_level value to “debug”:
    [data_feed_service.v1.sys.log]
    log_level = "debug"
Data Feed Output Syntax and Details
The outputted data from Data Feed consists of line-separated JSON strings. Each line represents the data for one node and contains the following properties:
    {
    "attributes": {
     "node_id": "",
     "name": "",
     "run_list": [],
     "chef_environment": "",
     "normal": {},
     "default": {},
     "override":{},
     "automatic":{},
     "normal_value_count": 0,
     "default_value_count": 1,
     "override_value_count": 1,
     "all_value_count": 10,
     "automatic_value_count": 8
    },
    "report": { ... },
    "client_run": { ... },
    "node": {
     "automate_fqdn": "",
     "ip_address" : "",
     "mac_address": "",
     "description":"",
     "serial_number":"",
     "os_service_pack":""
     }
    }