IAM Overview
Note
Chef Automate’s Identity and Access Management (IAM) allows direct management of policy members from Chef Automate in the browser. IAM supports the projects feature, which allow for filtering and segregation of your data amongst your user base. IAM policies allow you to use multiple permissions, distinguish policy membership from policy definition for fine-grained control, and include roles for role-based access control.
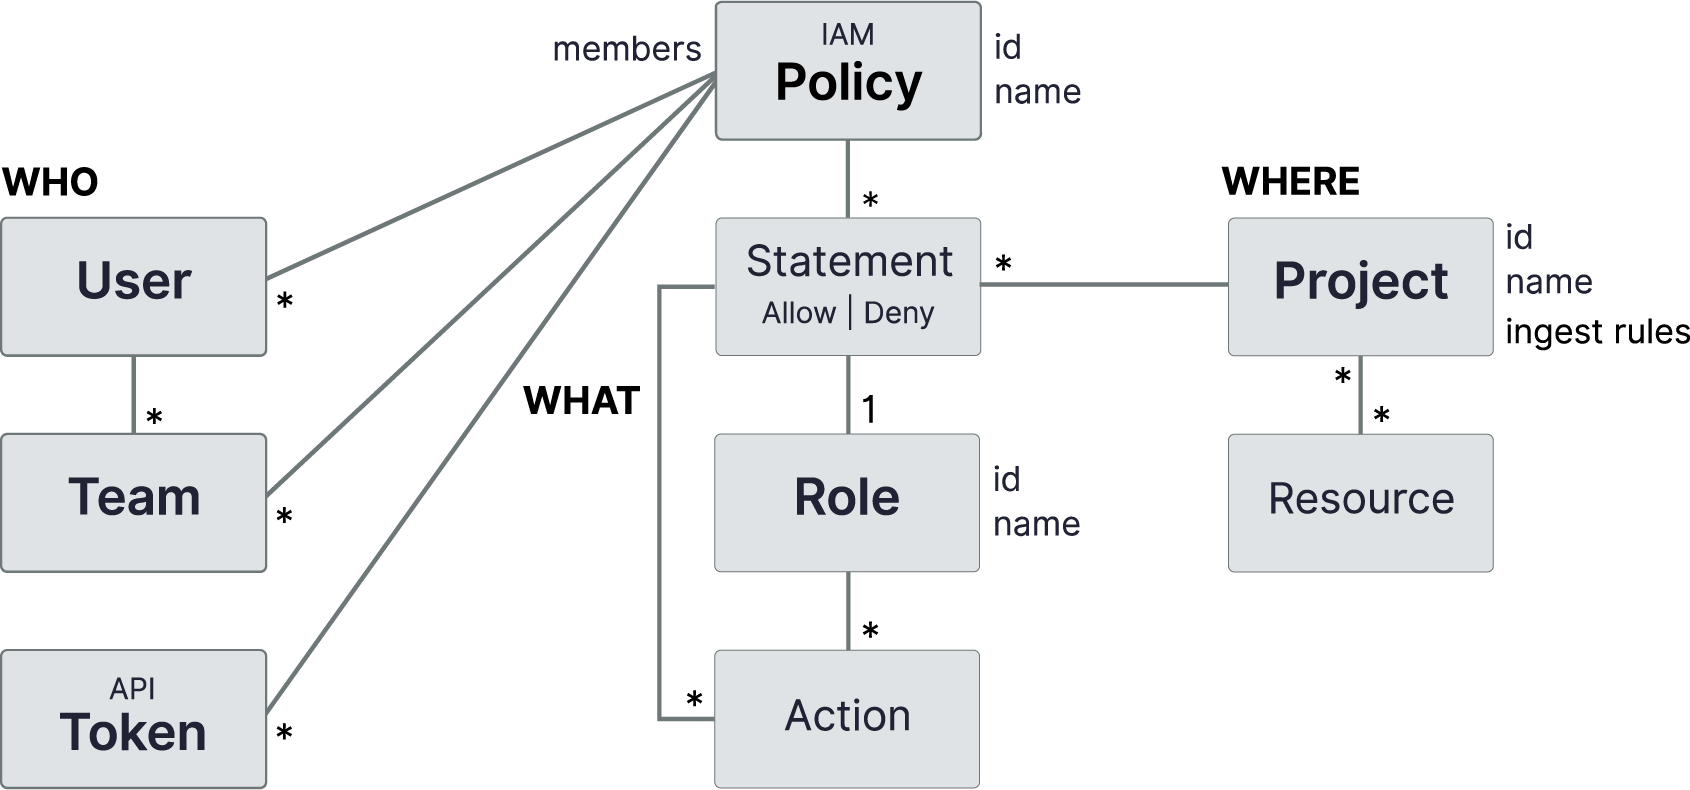
The policy exists at the heart of Chef Automate’s IAM system. A policy defines permissions for who may perform what action on which resource and scopes these permissions by project. The “who” may be a user, a team, or an API token.
The following diagram shows the new policy structure. We detail the specifics in the next sections.
Policy Definition
IAM uses multi-statement policies that support complex permissions. Each statement in a policy specifies a single permission. Chef Automate determines a policy’s net effect through the evaluation and combinations of permission statements. If at least one statement allows access, and none denies it, then the policy allows access. Otherwise, access denied.
Access is granted if explicitly allowed in some policy and not explicitly denied in any policy. IAM policy evaluation order is:
- By default, all requests are denied.
- Any explicit ALLOW overrides the default DENY.
- Any explicit DENY in any policy overrides any ALLOWs in any policy.
Net Effect Examples
The following examples illustrate the net effect of a policy and how it grants access to a user:
- User1, or any team that user1 belongs to, doesn’t include a policy with the
iam:users:listaction. Net effect: Access denied to user1 to view the list of users. This example illustrates the global default DENY condition. - Bob is a member of team alpha and team omega.
Team alpha contains a broad range of permissions, while team omega experiences severe restrictions in what its members may access.
The “major teams” policy has a statement that allows team alpha to access the resource
compliance:reporting:nodes, while it has another statement that denies Team Omega access to the same resource. Net effect: The policy denies Bob access because at least one statement denies access. - Mary is a member of the default viewers team, which allows read access to everything because of the default Viewers policy. Mary is also a member of the deployment team, which has permission to upload and download profiles. Net effect: The policy grants Mary access because membership in both teams effectively allows access.
Properties of a Policy
An IAM policy consists of a list of statements, where each statement describes a permission.
Properties of a Statement
A policy statement must include a Role, or a list of inline Actions.
| Property | Description |
|---|---|
| Role | a named list of actions |
| Effect | ALLOW or DENY |
| Projects | list of project IDs to constrain the role |
Properties of a Role
An IAM role consists of a list of actions. Some examples of these actions include listing IAM users, getting compliance profiles, or updating node status. Find more details about roles in Role-Based Access Control.
Members and Policies
A member may be a user, a team, or an API token. Users and teams may be local, meaning their definition exists within Chef Automate only, or managed by an external identity provider, specifically LDAP or SAML.
IAM v2 policy membership is separate and distinct from policy definition. (Notice that members were not included as part of the Policy Definition.) You can edit policy membership for any policy, but you can adjust only the policy definition for Custom policies.
Policy Types
IAM distinguishes two types of policies: Chef-managed and Custom. Chef provides Chef-managed policies, which are integral to the operation of Chef Automate. You can’t change the policy statements in Chef-managed policies. Custom policies are policies that you create for your own needs. You can add, edit, and delete policy statements in your custom policies.
Both types of policies allow for membership modification.
Role-Based Access Control
A role is a named list of actions. This list provides the benefit of encapsulation. A policy statement needs only the role’s name, and the policy isn’t burdened by all the details. Also, the list offers reusability as you can apply the role to any statement that needs it.
Just like policies, roles are either Chef-managed or Custom types. Default Chef-managed roles can’t change, like Chef-managed policies.
Chef Automate includes five Chef-managed roles and two Custom roles by default. You can edit these Custom roles, Compliance Viewer and Compliance Editor. To see the actions comprising the roles, see IAM Actions.
| Role | Type | Description |
|---|---|---|
| Viewer | Chef-managed | View everything in the system except IAM |
| Editor | Chef-managed | Do everything in the system except IAM and license application |
| Owner | Chef-managed | Do everything in the system including IAM |
| Project Owner | Chef-managed | Editor + view and assign projects |
| Ingest | Chef-managed | Ingest data into the system |
| Compliance Viewer | Custom | Viewer for compliance resources |
| Compliance Editor | Custom | Editor for compliance resources |
You can use these default Chef-created roles in your policies, or create more custom roles for further customized permissions. You can later edit any roles you create.
Chef Automate also ships with policies that leverage these roles. Those Chef-managed policies are Viewers, Editors, Administrator, and Ingest. The custom policies are Compliance Viewers and Compliance Editors.
Working with Projects
IAM projects are collections of resources either created in Chef Automate or ingested from external data providers, such as Chef Infra and Chef InSpec. Projects used in a policy reduce the scope of that policy’s permissions to only the resources assigned to the given projects.
Note
Setting Up Projects
Set up IAM projects using the following steps:
- Define each project using the browser. Start on the Projects List page to create your projects.
- Create or edit IAM policy statements to restrict permissions to specific projects as needed.
Every statement must either name specific projects, specify the wildcard (
*), which denotes all projects, or specify as(unassigned), which provides permissions on objects without projects. By default, any pre-upgrade previous policies are automatically set up with that wildcard, so they apply to all projects. - Assign teams or tokens to projects.
- Select the projects to filter in the UI. After creating projects, use the global project filter in the top navigation to select one or more projects for viewing. No selection displays all resources for which you have permission.
By default, Chef Automate includes a project-owner role, so the global admin may delegate much of these responsibilities for project management to others and share some of the global admin’s burden.
Assigning Resources to Projects
Two categories of resources exist for project assignment:
- Ingested client run and compliance nodes
- Teams, API Tokens, Policies, and Roles created in Chef Automate
Any of these resources not explicitly assigned to a project is unassigned. After upgrading and before creating projects, all your resources exist as unassigned.
Assign your set of ingested Client Run and Compliance Nodes to projects via the project ingest rules that you create for the project. An ingest rule specifies one or more conditions, and each condition specifies a set of attribute values that a node must include for assignment to the given project.
Once you define your set of projects with their contained ingest rules and conditions, use the Update Projects button on the bottom of any page to apply those definitions.
You can assign teams and API tokens to projects directly in the browser. You can assign policies and roles only through the command line. These resources created within Chef Automate don’t make use of, nor do they require, any project ingest rules.
Some resources in Chef Automate respect projects, and will filter when using the project filter. Resources that don’t respect projects will always display and will ignore any applied project filters.
Resources that respect projects
- API Tokens
- Ingested Client Run nodes
- Ingested Compliance nodes (including the results of a scan job)
- Policies
- Teams
- Roles
Resources that don’t respect projects
- Compliance Profiles
- Data Feeds
- Habitat Services
- Node Credentials
- Node Managers (also called Node Integrations)
- Notifications
- Users
Properties of a Project
To assign a project to a set of ingested client run and compliance nodes, the project requires a list of ingest rules, where each rule describes a group of node characteristics.
Project Ingest Rules
A rule consists of a list of conditions, where each condition describes a single characteristic. It also contains a type: node or event. node corresponds to ingested client run and compliance nodes, and event corresponds to ingested events on the Event Feed page.
| Property | Description |
|---|---|
| Type | node or event |
| Conditions | list of node characteristics |
Project Ingest Rule Conditions
A condition consists of these properties:
| Property | Description |
|---|---|
| Event Attribute | Chef Organization or Chef Infra Server |
| Node Attribute | Chef Organization, Chef Infra Server, Environment, Chef Role, Chef Tag, Chef Policy Name, or Chef Policy Group |
| Operator | equals or member of |
| Values | list of one or more values to match on the specified attribute |