Managed Services
Prerequisites
PostgreSQL Setup
Setup [PostgreSQL RDS DB instance]](https://docs.aws.amazon.com/AmazonRDS/latest/UserGuide/CHAP_GettingStarted.CreatingConnecting.PostgreSQL.html) in AWS.
To connect to the DB instance, the DB instance should be associated with a security group that provides access to it. Ensure External RDS is accessible from Automate instances.
Adding Resolvers for PostgreSQL Database
In case you want to resolve the PostgreSQL cluster node IPs dynamically using DNS servers, you can add resolvers/name servers to the configuration.
The two ways to add the name servers are:
Add name server IPs: If you are aware of the name servers which should resolve the PostgreSQL nodes, the name servers can be added to your
config.tomlfile.[pg_gateway.v1.sys.resolvers] # Multiple resolvers can be specified by adding the resolvers to the list. nameservers = ["127.0.0.53:53"]Set system DNS entries: To use existing system name server entries from
/etc/resolv.conf, add the following setting toconfig.toml:[pg_gateway.v1.sys.resolvers] enable_system_nameservers = true
If both options are set, name server IPs take precedence over the system name server entries.
Apply the changes:
sudo chef-automate config patch config.toml
If you wish to reset to the default configuration or to modify the configuration:
- Run
chef-automate config show > config.toml. - Edit
config.tomlto replace/edit thepg_gateway.v1.sys.resolverssection with the configuration values. - Run
chef-automate config set config.tomlto apply your changes.
OpenSearch Setup
- Create an OpenSearch domain.
To create the domain, follow the steps given below:
Use version 1.2 and above.
Uncheck the Enable Dedicated Master Nodes option under the Dedicated Master Nodes section.
Select Enable Fine-grained Access Control and choose Create Master User, under Fine-grained Access Control Section. Add
master usernameandmaster passwordfor the master user.Select Configure Domain Level Access Policy under the
Access policysection and modify theEffectfrom Deny to Allow.Copy the
domain arnof the newly created OpenSearch, example:arn:aws:es:region:123456789012:domain/domain-name
Enabling OpenSearch Backup Restore
The steps to enable backup and restore in OpenSearch S3 is:
Create an IAM role with the Permission listed below. The rest of the document refers to the role as
TheSnapshotRole.- AmazonS3FullAccess
In Select trusted entities of
TheSnapshotRoleto specify the OpenSearch Service in the Principal statement as shown in the following example:{ "Version": "2012-10-17", "Statement": [ { "Effect": "Allow", "Principal": { "Service": ["opensearchservice.amazonaws.com", "ec2.amazonaws.com"] }, "Action": "sts:AssumeRole" } ] }Copy the
arnvalue ofTheSnapshotRole, example:arn:aws:iam::123456789012:role/TheSnapshotRoleCreate a IAM policy with the json as given below:
Replace the iam:PassRole resource with the snapshot role arn we copied previously and replace the es:ESHttpPut resource with your OpenSearch domain arn value which we had copied along with
/*in the end:{ "Version": "2012-10-17", "Statement": [ { "Effect": "Allow", "Action": "iam:PassRole", "Resource": "arn:aws:iam::123456789012:role/TheSnapshotRole" // ARN of IAM role i.e. TheSnapshotRole }, { "Effect": "Allow", "Action": "es:ESHttpPut", "Resource": "arn:aws:es:region:123456789012:domain/domain-name/*" // ARN of OpenSearch domain } ] }
Now edit your snapshot role
TheSnapshotRoleand attach this newly created policy.Create an IAM user and attach the above permission policy, which are added for
TheSnapshotRole. Save the security credentials for this IAM user for S3 backup/restore. Also save the IAM user arn to be used on OpenSearch Dashboard.Map the snapshot role in OpenSearch Dashboards.
Navigate to the OpenSearch Dashboards url from the OpenSearch Service console.
From the OpenSearch Dashboards, navigate to Security in the main menu and choose Roles, and then select the
manage_snapshotsrole.Choose Mapped users, and select Manage mapping.
Add the domain ARN of the user and role that has permission to pass the newly created
TheSnapshotRole. Put user ARNs under Users and role ARNs under Backend roles.arn:aws:iam::123456789123:user/user-namearn:aws:iam::123456789123:role/role-nameSelect Map and confirm the user and role showing up under Mapped users.

In case of Automate HA, add the following permission in OpenSearch Dashboard.
Navigate to the OpenSearch Dashboards URL from the OpenSearch Service console.
From the OpenSearch Dashboards, navigate to Security in the main menu and choose Roles, and then select the
manage_snapshotsrole.Select
Edit role.Under the Index permissions, Add the
indices:admin/deleteand then select Update to save the changes.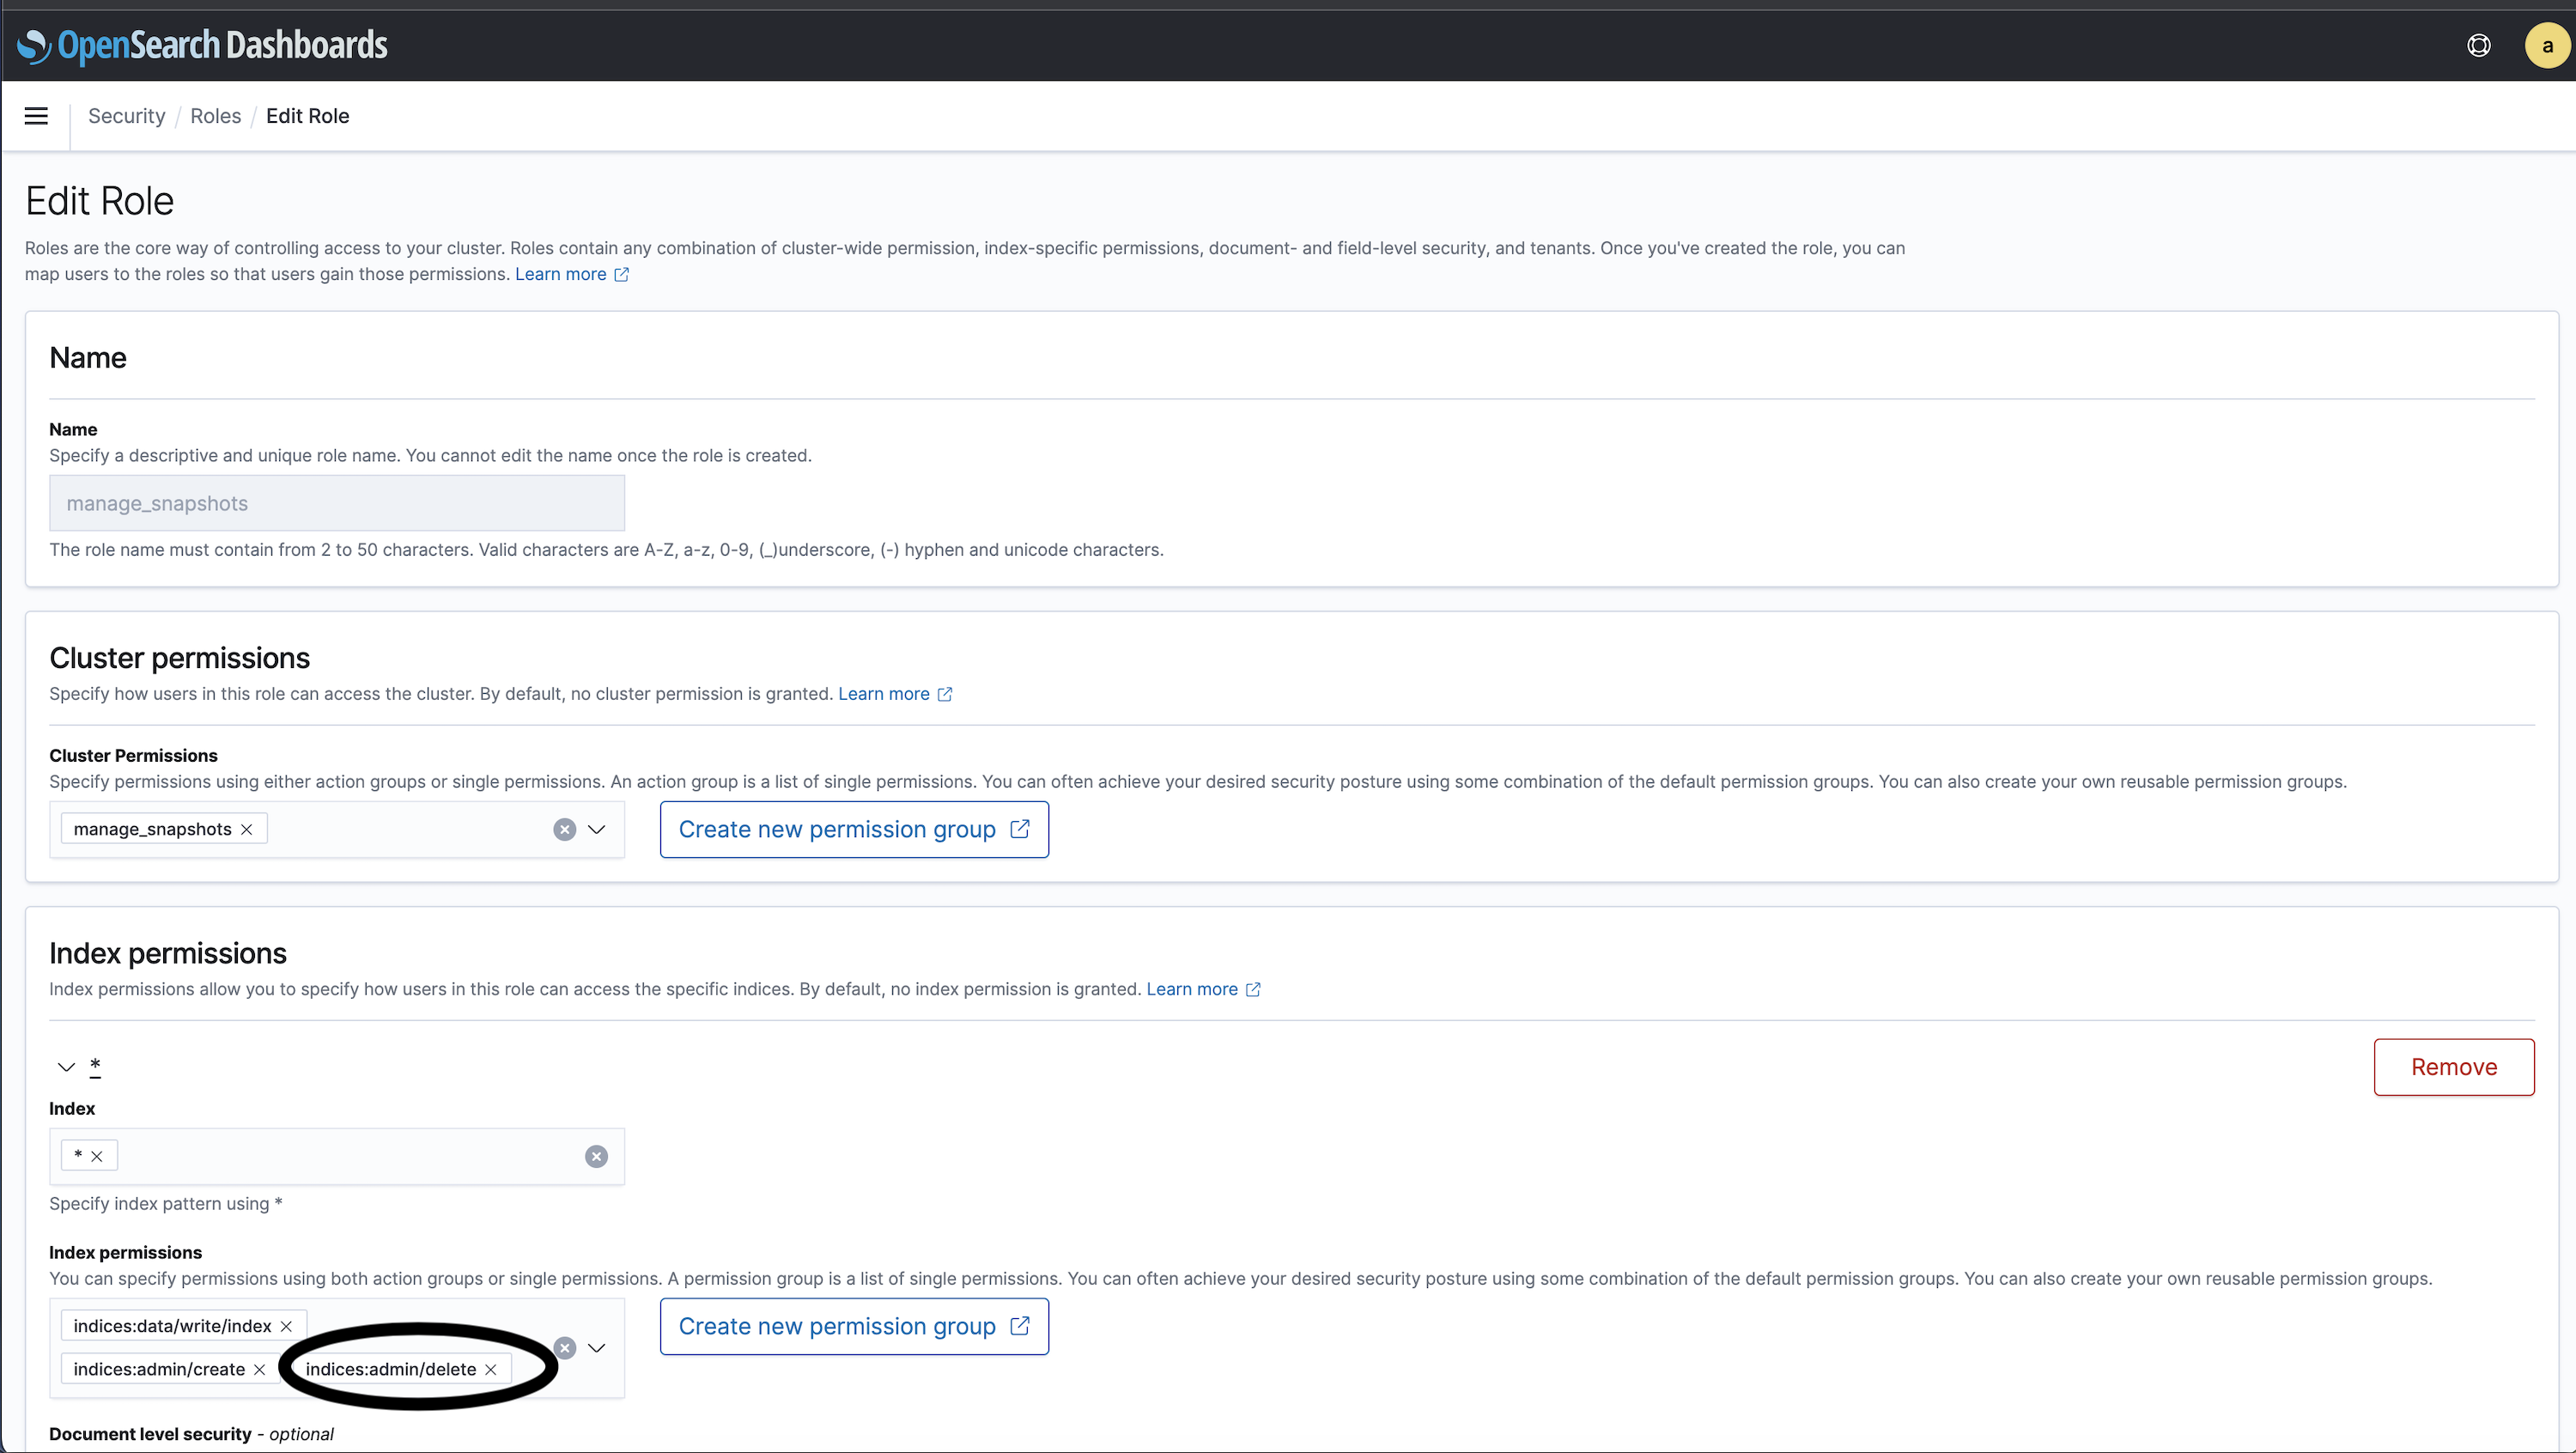
Note
To access the default installation of OpenSearch Dashboards for a domain that resides within a VPC, you must have access to the VPC. This process varies by network configuration but likely involves connecting to a VPN or managed network or using a proxy server or transit gateway. To know more, see the OpenSearch VPC developer guide.
From the terminal, run the following command:
ssh -i ~/.ssh/your-key.pem ec2-user@your-ec2-instance-public-ip -N -L 9200:vpc-domain-name.region.es.amazonaws.com:443
The above command creates an SSH tunnel that forwards requests to https://localhost:9200 to your OpenSearch Service domain through the EC2 instance. Specifying port 9200 in the command simulates a local OpenSearch install, but you can any port. OpenSearch Service only accepts connections over port 80 (HTTP) or 443 (HTTPS).
The command provides no feedback and runs indefinitely. Select Ctrl + C to stop the command.
Navigate to https://localhost:9200/\_dashboards/ in your web browser. To navigate, acknowledge a security exception.
Alternately, you can send requests to https://localhost:9200 using curl, Postman, or any programming language.
Add Resolvers for OpenSearch
If you want to dynamically resolve the OpenSearch node IPs using DNS servers, you can add resolvers/name servers to the configuration.
The two ways to add the name servers are:
Add name server IPs: Add the name servers to your
config.tomlfile to resolve the OpenSearch nodes.[esgateway.v1.sys.ngx.main.resolvers] # Multiple resolvers can be specified by adding the resolvers to the list. nameservers = ["192.0.2.0:24", "198.51.100.0:24"]Set system DNS entries: To use existing system name server entries from
/etc/resolv.conf, add the following setting toconfig.toml:[esgateway.v1.sys.ngx.main.resolvers] enable_system_nameservers = true
If both options are set, name server IPs precede the system name server entries.
Apply the changes:
sudo chef-automate config patch config.toml
If you wish to reset to the default configuration or to modify the configuration:
- Run
chef-automate config show > config.toml. - Open
config.tomland remove theesgateway.v1.sys.ngx.main.resolversconfiguration or change the values. - Run
chef-automate config set config.tomlto apply your changes.
Chef Automate Backup from Embedded PostgreSQL/OpenSearch and restore to External AWS PostgreSQL/OpenSearch
This section lets you switch to an AWS-managed PostgreSQL RDS/OpenSearch services. The steps are applied only if you currently use standalone Chef Automate with internal automated PostgreSQL and OpenSearch.
If you already have Chef Automate setup running with embedded PostgreSQL/OpenSearch services and S3 backup configuration, follow the steps below:
Before switching to external AWS PostgreSQL RDS/OpenSearch services, take s3 backup by following the below steps:
Create a Backup
Make a backup with the backup create command:
chef-automate backup create
The output shows the backup progress for each service. A successful backup displays a success message containing the timestamp of the backup:
Success: Created backup 20180518010336
List Backups
You can list existing backups with the backup list command:
chef-automate backup list
The output shows each backup and its age:
        Backup        State  Age
20180508201548    completed  8 minutes old
20180508201643    completed  8 minutes old
20180508201952    completed  4 minutes old
This command default communicates with the running Chef Automate installation to list the backups. You can still record the backups if the Chef Automate installation is down.
For backups stored in an AWS S3 bucket, use the following command:
chef-automate backup list s3://bucket_name/base_path
In the above code, bucket_name is the name of the S3 bucket and base_path is an optional path within the bucket where the backups live.
Follow the steps below to configure Chef Automate to run with external AWS PostgreSQL RDS/OpenSearch services:
Configuring External AWS PostgreSQL RDS
These configuration directions are intended for the initial deployment of Chef Automate.
Create postgresql.toml file and add the following details of your AWS PostgreSQL RDS:
The following characters aren’t allowed in passwords:
`(backtick)'(single quote)"(double quote)\(backslash);(semicolon)$(dollar sign)
[global.v1.external.postgresql]
enable = true
nodes = ["<pghostname1>:<port1>", "<pghostname2>:<port2>", "..."]

# To use PostgreSQL with SSL, change enable to true and uncomment root_cert:
[global.v1.external.postgresql.ssl]
enable = false
# root_cert = """$(cat </path/to/root/cert.pem>)"""

[global.v1.external.postgresql.auth]
scheme = "password"

# Create these PostgreSQL users before starting the Automate deployment;
# Automate assumes they already exist.
[global.v1.external.postgresql.auth.password.superuser]
username = "<admin username>"
password = "<admin password>"
[global.v1.external.postgresql.auth.password.dbuser]
username = "<dbuser username>"
password = "<dbuser password>"

[global.v1.external.postgresql.backup]
enable = true
Run the following command to apply your configuration:
chef-automate config patch postgresql.toml
Verify whether all services are running using:
chef-automate status
Verify if the Chef Automate is running with an external OpenSearch by running the command below:
chef-automate config show
Configure External AWS OpenSearch
These configuration directions are intended for External AWS managed OpensSearch service.
Create opensearch.toml file and add the following information to your AWS OpenSearch:
[global.v1.external.opensearch]
enable = true
nodes = ["https://<domain>.<region>.es.amazonaws.com"]

# fill out if using external AWS OpenSearch service with SSL and aws_os auth
[global.v1.external.opensearch.auth]
scheme = "aws_os"
[global.v1.external.opensearch.auth.aws_os]
## Create this OpenSearch user and IAM user before starting the Automate deployment;
## Automate assumes it exists.
username = "<admin username>"
password =  "<admin password>"
## credentials (required) for IAM user created for s3 backup/restore as mentioned in setup
access_key = "<access key>"
secret_key = "<secret key>"
[global.v1.external.opensearch.ssl]
## Specify either a root_cert or a root_cert_file
root_cert = """$(cat </path/to/cert_file.crt>)"""

# For S3 backups add the following section in config.toml or can be patched later
[global.v1.external.opensearch.backup]
enable = true
location = "s3"
[global.v1.external.opensearch.backup.s3]
## bucket (required): The name of the bucket
bucket = "<bucket name>"
## base_path (optional):  The path within the bucket where backups should be stored
## If base_path isn't set, backups will be stored at the root of the bucket.
base_path = "<base path>"
client = "default"
[global.v1.external.opensearch.backup.s3.settings]
region = "<bucket region>"
## IAM role ARN (required) to access s3 for backup/restore i.e. TheSnapshotRole
role_arn = "<IAM role ARN to access s3 for backup/restore i.e. TheSnapshotRole>"
Run the following command to apply your configuration:
chef-automate config patch opensearch.toml
Verify whether all services are running using:
chef-automate status
Verify if the Chef Automate is running with external OpenSearch by running the below command:
chef-automate config show
If you have taken a backup from Chef Automate’s internal automated OpenSearch service and restored it to the external AWS OpenSearch service, follow the steps below to register the snapshot repository manually before restoring data to the external AWS OpenSearch service.
Registering Snapshot Repository
To register a snapshot repository, send a PUT request to the OpenSearch Service domain endpoint. Don’t use curl to operate as it doesn’t support AWS request signing. Instead, use the sample Python client, Postman, or some other method to send a signed request to register the snapshot repository.
Make sure to follow the steps mentioned in the prerequisite while setting up the Amazon OpenSearch Domain. Use the same role_arn and IAM user credentials mapped to the manage_snapshots role on OpenSearch dashboards.
If using Postman to send the API request below, select AWS Signature under the Authorization Tab and fill AccessKey, SecretKey, AWS Region, and Service Name as es.
The request takes the following format:
PUT domain-endpoint/_snapshot/<snapshot-repo-name>
{
  "type": "s3",
  "settings": {
    "bucket": "s3-bucket-name",
    "base_path": "elasticsearch/<snapshot-repo-name>",
    "region": "<region>",
    "role_arn": "arn:aws:iam::123456789012:role/TheSnapshotRole"
  }
}
Register the following repositories by replacing <snapshot-repo-name> in the above request sample and send a request for each of the following repositories:
chef-automate-es5-automate-cs-oc-erchef
chef-automate-es5-compliance-service
chef-automate-es5-event-feed-service
chef-automate-es5-ingest-service
chef-automate-es6-automate-cs-oc-erchef
chef-automate-es6-compliance-service
chef-automate-es6-event-feed-service
chef-automate-es6-ingest-service
If your domain resides within a virtual private cloud (VPC), your computer must be connected to the VPC for the request to register the snapshot repository successfully. Accessing a VPC varies by network configuration but likely involves connecting to a VPN or corporate network. Reach the OpenSearch Service domain, navigate to https://your-vpc-domain.region.es.amazonaws.com in a web browser and verify that you receive the default JSON response.
You can get the information about all snapshot repositories registered in the cluster by using the following API:
GET _snapshot/_all
Take a backup of Chef Automate updated config with details of external PostgreSQL/OpenSearch to a new file like full_config.toml by running the following command:
chef-automate config show > full_config.toml
Restore From an AWS S3 Backup
Meet the required prerequisites before beginning your restore process.
See how to backup to AWS S3.
Pass the s3 access key and s3 secret key to restore the command.
Use the --patch-config option with a new updated config full_config.toml to restore data to external PostgreSQL/OpenSearch:
To restore from an AWS S3 bucket backup on a new host, run:
chef-automate backup restore s3://bucket_name/path/to/backups/BACKUP_ID --patch-config full_config.toml --s3-access-key <access_key> --s3-secret-key <secret_key>
To restore from an AWS S3 bucket backup on an existing Chef Automate host, run:
chef-automate backup restore s3://bucket_name/path/to/backups/BACKUP_ID --skip-preflight --patch-config full_config.toml --s3-access-key "Access_Key" --s3-secret-key "Secret_Key"
A successful restore shows the timestamp of the backup used at the end of the status output:
Success: Restored backup 20180517223558
Note
automate-opensearch and automate-postgresql services come up for a short time while running the restore operation but they will get deactivated after restore is successful and data will be restored on externally managed RDS/ Amazon RDS.Chef Automate with External AWS PostgreSQL/OpenSearch Backup/Restore
If you are planning to set Chef Automate with External AWS PostgreSQL/OpenSearch services and use backup/restore on these externally managed services, follow the steps below:
Download the Chef Automate Command-Line Tool
Download and unzip the Chef Automate command-line tool:
curl https://packages.chef.io/files/current/latest/chef-automate-cli/chef-automate_linux_amd64.zip | gunzip - > chef-automate && chmod +x chef-automate
Create Default Configuration
Create a config.toml file with default values for your Chef Automate installation:
chef-automate init-config
You can customize your FQDN, login name, and other values, by changing the values in the config.toml in your editor.
Configuring External AWS PostgreSQL RDS
These configuration directions are intended for External AWS managed PostgreSQL RDS service.
Add the following settings to your config.toml:
The following characters aren’t allowed in passwords:
`(backtick)'(single quote)"(double quote)\(backslash);(semicolon)$(dollar sign)
[global.v1.external.postgresql]
enable = true
nodes = ["<pghostname1>:<port1>", "<pghostname2>:<port2>", "..."]

# To use PostgreSQL with SSL, change enable to true and uncomment root_cert:
[global.v1.external.postgresql.ssl]
enable = false
# root_cert = """$(cat </path/to/root/cert.pem>)"""

[global.v1.external.postgresql.auth]
scheme = "password"

# Create these PostgreSQL users before starting the Automate deployment;
# Automate assumes they already exist.
[global.v1.external.postgresql.auth.password.superuser]
username = "<admin username>"
password = "<admin password>"
[global.v1.external.postgresql.auth.password.dbuser]
username = "<dbuser username>"
password = "<dbuser password>"

[global.v1.external.postgresql.backup]
enable = true
Configure External AWS OpenSearch
These configuration directions are intended for External AWS managed OpenSearch service.
Add the following to your config.toml file:
The following characters aren’t allowed in passwords:
`(backtick)'(single quote)"(double quote)\(backslash);(semicolon)$(dollar sign)
[global.v1.external.opensearch]
enable = true
nodes = ["https://<domain>.<region>.es.amazonaws.com"]

# fill out if using external aws OpenSearch service with SSL and aws_os auth
[global.v1.external.opensearch.auth]
scheme = "aws_os"
[global.v1.external.opensearch.auth.aws_os]
## Create this OpenSearch user and IAM user before starting the Automate deployment;
## Automate assumes it exists.
username = "<admin username>"
password =  "<admin password>"
## credentials (required) for IAM user created for s3 backup/restore as mentioned in setup
access_key = "<access key>"
secret_key = "<secret key>"
[global.v1.external.opensearch.ssl]
## Specify either a root_cert or a root_cert_file
root_cert = """$(cat </path/to/cert_file.crt>)"""

# For S3 backups add the following section in config.toml or can be patched later
[global.v1.external.opensearch.backup]
enable = true
location = "s3"
[global.v1.external.opensearch.backup.s3]
## bucket (required): The name of the bucket
bucket = "<bucket name>"
## base_path (optional):  The path within the bucket where backups should be stored
## If base_path isn't set, backups will be stored at the root of the bucket.
base_path = "<base path>"
client = "default"
[global.v1.external.opensearch.backup.s3.settings]
region = "<bucket region>"
## IAM role ARN (required) to access s3 for backup/restore i.e. TheSnapshotRole
role_arn = "<IAM role ARN to access s3 for backup/restore i.e. TheSnapshotRole>"
Configure S3 backup
To store backups in an existing AWS S3 bucket, add the following to your config.toml file:
[global.v1.backups]
  location = "s3"
[global.v1.backups.s3.bucket]
  # name (required): The name of the bucket
  name = "<bucket name>"

  # endpoint (required): The endpoint for the region the bucket lives in.
  endpoint = "https://s3.amazonaws.com"

  # base_path (optional):  The path within the bucket where backups should be stored
  # If base_path isn't set, backups will be stored at the root of the bucket.
  base_path = "<base path>"

[global.v1.backups.s3.credentials]
  # Optionally, AWS credentials may be provided. If these aren't provided, IAM instance
  # credentials will be used. It's also possible for these to be read through the standard
  # AWS environment variables or through the shared AWS config files.
  access_key = "<access_key>"
  secret_key = "<secret_key>"
  # session_token (optional)
  session_token = "<session_token>"

[global.v1.backups.s3.ssl]
  # root_cert (optional): The root certificate used for SSL validation.
  # For S3 compatible APIs, you can set the SSL root cert if needed
  root_cert = """
  -----BEGIN CERTIFICATE-----
  ...
  -----END CERTIFICATE-----
You can provide the same user credentials with AmazonS3FullAccess permission created during the prerequisite steps of OpenSearch setup.
Deploy Chef Automate
chef-automate deploy config.toml
Deployment takes a few minutes. The first step is accepting the terms of service in the command line, after which the installer performs a series of pre-flight checks; any unsuccessful checks have information for resolving issues or skipping the check. Run the deploy command again, after resolving any pre-flight issues.
At the end of the deployment process you will see:
Deploy complete
The deployment process writes login credentials to the automate-credentials.toml in your current working directory.
Note
In case you already have Chef Automate setup with AWS PostgreSQL/OpenSearch. To change or move to new AWS PostgreSQL or OpenSearch service, you can create patch files with updated AWS services config information and patch it into existing Chef Automate using the command below:
chef-automate config patch </path/to/patch.toml>
Open Chef Automate
Navigate to https://automate.example.com in a browser and log in to Chef Automate with the credentials provided in automate-credentials.toml. Once you log in, Chef Automate prompts you for a license.
When your Chef Automate instance is equipped with internet connectivity, you can get a 60-day trial license from there. Alternatively, a license obtained by other means can be applied.
Create a Backup
Make a backup with the backup create command:
chef-automate backup create
The output shows the backup progress for each service. A successful backup displays a success message containing the timestamp of the backup:
Success: Created backup 20180518010336
List Backups
You can list existing backups with the backup list command:
chef-automate backup list
The output shows each backup and its age:
        Backup        State  Age
20180508201548    completed  8 minutes old
20180508201643    completed  8 minutes old
20180508201952    completed  4 minutes old
By default, the command communicates with your running Chef Automate installation to list the backups. If the Chef Automate installation is down, you can still list the backups.
For backups stored in an AWS S3 bucket, use:
chef-automate backup list s3://bucket_name/base_path
Here, bucket_name is the name of the S3 bucket and base_path is an optional path within the bucket where the backups live.
Restore From an AWS S3 Backup
Meet the required prerequisites before beginning your restore process.
See how to back up to AWS S3. Pass s3 access key and s3 secret key to restore command.
To restore from an AWS S3 bucket backup on a new host, run:
chef-automate backup restore s3://bucket_name/path/to/backups/BACKUP_ID --s3-access-key <access_key> --s3-secret-key <secret_key>
To restore from an AWS S3 bucket backup on an existing Chef Automate host, run:
chef-automate backup restore s3://bucket_name/path/to/backups/BACKUP_ID --skip-preflight --s3-access-key <access_key> --s3-secret-key <secret_key>
Use the --patch-config option with a configuration patch file patch.toml, if you are restoring data to new AWS managed PostgreSQL RDS or OpenSearch service or to a host with a different FQDN than that of the backup host. Mention all the config changes that are done after backup is taken in a single patch file before running below restore command:
chef-automate backup restore s3://bucket_name/path/to/backups/BACKUP_ID --patch-config </path/to/patch.toml> --skip-preflight --s3-access-key <access_key> --s3-secret-key <secret_key>
A successful restore shows the timestamp of the backup used at the end of the status output:
Success: Restored backup 20180517223558
Note