Chef for Windows
Overview
The Chef Infra Client has specific components that are designed to support unique aspects of the Windows platform, including PowerShell, PowerShell DSC, and Internet Information Services (IIS).
Chef Infra Client can be installed on machines running Windows in the following ways:
- By bootstrapping Chef Infra Client using knife bootstrap from a local workstation using WinRM
- By downloading Chef Infra Client to the target node, and then running the Microsoft Installer Package (MSI) locally
- By using an existing process already in place for managing Microsoft Windows machines, such as System Center
Setting up Windows Workstations
To set up your Windows workstation follow the steps on Chef for Windows
Install Chef Infra Client on Windows Nodes
Chef Infra Client is an agent that runs locally on every node that’s under management by Chef Infra Server. When Chef Infra Client runs, it performs all of the steps required for bringing a node into the expected state, including:
- Registering and authenticating the node with Chef Infra Server
- Synchronizing cookbooks from the Chef Infra Server to the node
- Compiling the resource collection by loading each of the required cookbooks, including recipes, attributes, and all other dependencies
- Taking the appropriate and required actions to configure the node based on recipes and attributes
- Reporting summary information on the run to Chef Automate
This command has the following syntax:
chef-client OPTION VALUE OPTION VALUE ...
This command has the following option specific to Windows:
-A,--fatal-windows-admin-checkCause a Chef Infra Client run to fail when Chef Infra Client does not have administrator privileges in Windows.
System Requirements
The recommended minimum amount of RAM available to Chef Infra Client during a Chef Infra Client run is 512MB. Each node and workstation must have access to Chef Infra Server using HTTPS. The Chef Infra Client can be used to manage machines that run on the following versions of Microsoft Windows:
| Operating System | Architecture | Version |
|---|---|---|
| Windows | x86, x64 | 8.1, 2012, 2012 R2, 2016, 10 (all channels except "insider" builds), 2019 (Long-term servicing channel (LTSC), both Desktop Experience and Server Core) |
After Chef Infra Client is installed, it’s located at C:\opscode. The
main configuration file for Chef Infra Client is located at
C:\chef\client.rb.
Information for Windows Users
Run With Elevated Privileges
The Chef Infra Client may need to be run with elevated privileges in order to get a recipe to converge correctly. On UNIX and UNIX-like operating systems this can be done by running the command as root. On Windows this can be done by running the command prompt as an administrator.On Windows, running without elevated privileges (when they are necessary) is an issue that fails silently. It will appear that Chef Infra Client completed its run successfully, but the changes will not have been made. When this occurs, do one of the following to run Chef Infra Client as the administrator:
Log in to the administrator account. (This isn’t the same as an account in the administrator’s security group.)
Run Chef Infra Client process from the administrator account while being logged into another account. Run the following command:
runas /user:Administrator "cmd /C chef-client"This will prompt for the administrator account password.
Open a command prompt by right-clicking on the command prompt application, and then selecting Run as administrator. After the command window opens, Chef Infra Client can be run as the administrator
Spaces and Directories
Directories that are used by Chef products on Windows can’t have spaces. For example,C:\Users\User Name won’t work, but
C:\Users\UserName will. Chef commands may fail if used against a
directory with a space in its name.Top-level Directory Names
Windows will throw errors when path name lengths are too long. For this reason, it’s often helpful to use a short top-level directory, much like what’s done in UNIX and Linux. For example, Chef uses/opt/ to
install Chef Workstation on macOS. A similar approach can be done on
Windows, by creating a top-level directory with a short name.
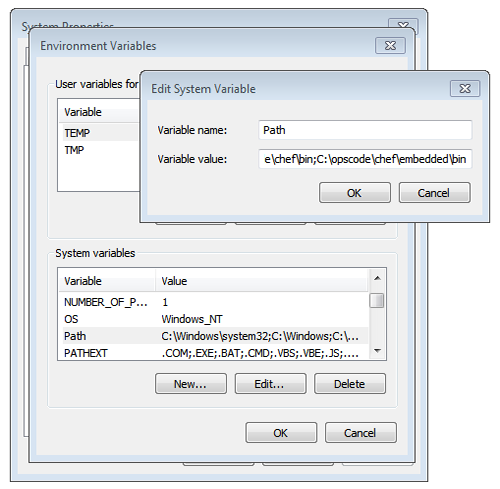
For example: C:\chef.PATH System Variable
On Windows, Chef Infra Client must have two entries added to
the PATH environment variable:
C:\opscode\chef\binC:\opscode\chef\embedded\bin
This is typically done during the installation of Chef Infra Client
automatically. If these values (for any reason) aren’t in the PATH
environment variable, Chef Infra Client won’t run properly.
Proxy Settings
To determine the current proxy server on the Windows platform:
- Open Internet Properties.
- Open Connections.
- Open LAN settings.
- View the Proxy server setting. If this setting is blank, then a proxy server may not be available.
To configure proxy settings in Windows:
- Open System Properties.
- Open Environment Variables.
- Open System variables.
- Set
http_proxyandhttps_proxyto the location of your proxy server. This value MUST be lowercase.
Remotely administering nodes
Theknife windows subcommand is used to interact with Windows systems
managed by Chef Infra. Nodes are configured using WinRM, which allows
external applications to call native objects like batch scripts, Windows
PowerShell scripts, or scripting library variables. The knife windows
subcommand supports NTLM and Kerberos methods of authentication.For more information, see the knife windows documentation.
Ports
WinRM requires that a target node be accessible using the ports configured to support access using HTTP or HTTPS.Install Chef Infra Client using the MSI Installer
A Microsoft Installer Package (MSI) is available for installing Chef Infra Client on a Windows machine from Chef Downloads.
Msiexec.exe
Msiexec.exe is used to install Chef Infra Client on a node as part of a bootstrap operation. The actual command that’s run by the default bootstrap script is:
msiexec /qn /i "%LOCAL_DESTINATION_MSI_PATH%"
where /qn is used to set the user interface level to “No UI”, /i is
used to define the location in which Chef Infra Client is installed, and
"%LOCAL_DESTINATION_MSI_PATH%" is a variable defined in the default
windows-chef-client-msi.erb
bootstrap template. See
https://docs.microsoft.com/en-us/windows/win32/msi/command-line-options
for more information about the options available to Msiexec.exe.
ADDLOCAL Options
The ADDLOCAL parameter adds two setup options specific to Chef Infra
Client. These options can be passed along with an Msiexec.exe command:
| Option | Description |
|---|---|
ChefClientFeature | Use to install Chef Infra Client. |
ChefSchTaskFeature | Use to configure Chef Infra Client as a scheduled task in Windows. |
ChefPSModuleFeature | Used to install the chef PowerShell module. This will enable chef command line utilities within PowerShell. |
First install Chef Infra Client, and then enable it to run as a scheduled task. For example:
msiexec /qn /i C:\inst\chef-client-15.3.14-1-x64.msi ADDLOCAL="ChefClientFeature,ChefSchTaskFeature,ChefPSModuleFeature"
Enable as a Scheduled Task
To run Chef Infra Client at periodic intervals (so that it can check in with Chef Infra Server automatically), configure Chef Infra Client to run as a scheduled task. This can be done using the MSI, by selecting the Chef Unattended Execution Options –> Chef Infra Client Scheduled Task option on the Custom Setup page or by running the following command after Chef Infra Client is installed:
For example:
SCHTASKS.EXE /CREATE /TN ChefClientSchTask /SC MINUTE /MO 30 /F /RU "System" /RP /RL HIGHEST /TR "cmd /c \"C:\opscode\chef\embedded\bin\ruby.exe C:\opscode\chef\bin\chef-client -L C:\chef\chef-client.log -c C:\chef\client.rb\""
Refer to the Schtasks documentation for more details.
After Chef Infra Client is configured to run as a scheduled task, the
default file path is: c:\chef\chef-client.log.
Install Chef Infra Client using an Existing Process
Many organizations already have processes in place for managing the applications and settings on various Windows machines. For example, System Center. Chef Infra Client can be installed using this method.Windows Cookbooks
Some of the most popular Chef-maintained cookbooks that contain custom resources useful when configuring machines running Windows are listed below:
| Cookbook | Description |
|---|---|
| iis Cookbook | The iis cookbook is used to install and configure Internet Information Services (IIS). |
| iis_urlrewrite Cookbook | This cookbook downloads and installs the IIS URL Rewrite 2.0 extension into Microsoft Internet Information Server. |
| PowerShell Cookbook | Installs and configures PowerShell 2.0, 3.0, 4.0 or 5.0. |
| Microsoft Visual C++ Runtime Cookbook | Installs Microsoft Visual C++ runtime version 6 (2005), 9 (2008), 10 (2010), 11 (2012), 12 (2013), 14 (2015) or 15 (2017) on Windows. |
| Mingw Cookbook | Installs msys/mingw compiler toolchains on windows. |
| Webpi Cookbook | The webpi cookbook is used to run the Microsoft Web Platform Installer (WebPI). |
Community Supported Windows Projects
Two community supports two provisioners for Kitchen:
Windows Resources
A resource is a statement of configuration policy that:
- Describes the desired state for a configuration item
- Declares the steps needed to bring that item to the desired state
- Specifies a resource type—such as
package,template, orservice - Lists additional details (also known as resource properties), as necessary
- Are grouped into recipes, which describe working configurations
Windows Resources
Chef Infra provides a growing number of Windows-specific resources.
- cab_package
- chef_client_scheduled_task
- chocolatey_config
- chocolatey_feature
- chocolatey_package
- chocolatey_source
- dsc_resource
- dsc_script
- msu_package
- powershell_package_source
- powershell_package
- powershell_script
- registry_key
- windows_ad_join
- windows_audit_policy
- windows_auto_run
- windows_certificate
- windows_defender_exclusion
- windows_defender
- windows_dfs_folder
- windows_dfs_namespace
- windows_dfs_server
- windows_dns_record
- windows_dns_zone
- windows_env
- windows_feature_dism
- windows_feature_powershell
- windows_feature
- windows_firewall_profile
- windows_firewall_rule
- windows_font
- windows_package
- windows_pagefile
- windows_path
- windows_printer_port
- windows_printer
- windows_security_policy
- windows_service
- windows_share
- windows_shortcut
- windows_task
- windows_uac
- windows_user_privilege
- windows_workgroup
Windows Compatible Resources
The most popular core resources in Chef Infra Client work the same way in Windows as they do on any UNIX or Linux-based platform.
- cookbook_file
- directory
- execute
- file
- group
- http_request
- link
- mount
- package
- remote_directory
- remote_file
- ruby_block
- service
- template
- user
The file-based resources have attributes that support unique
requirements within the Windows platform, including inherits
(for file inheritance), mode (for octal modes), and rights (for
access control lists, or ACLs).