Chef Infra Client Runs
Overview
The Client Runs page shows all nodes connected to Chef Automate, either directly or through a Chef Infra Server proxy. Nodes appear in this view after a Chef Infra Client run completes.
Chef Infra Client Run Status overview
The Chef Infra Client Run Status chart displays a summary of node statuses: failed, successful, or missing, and the total node count. The chart changes as you select filters.
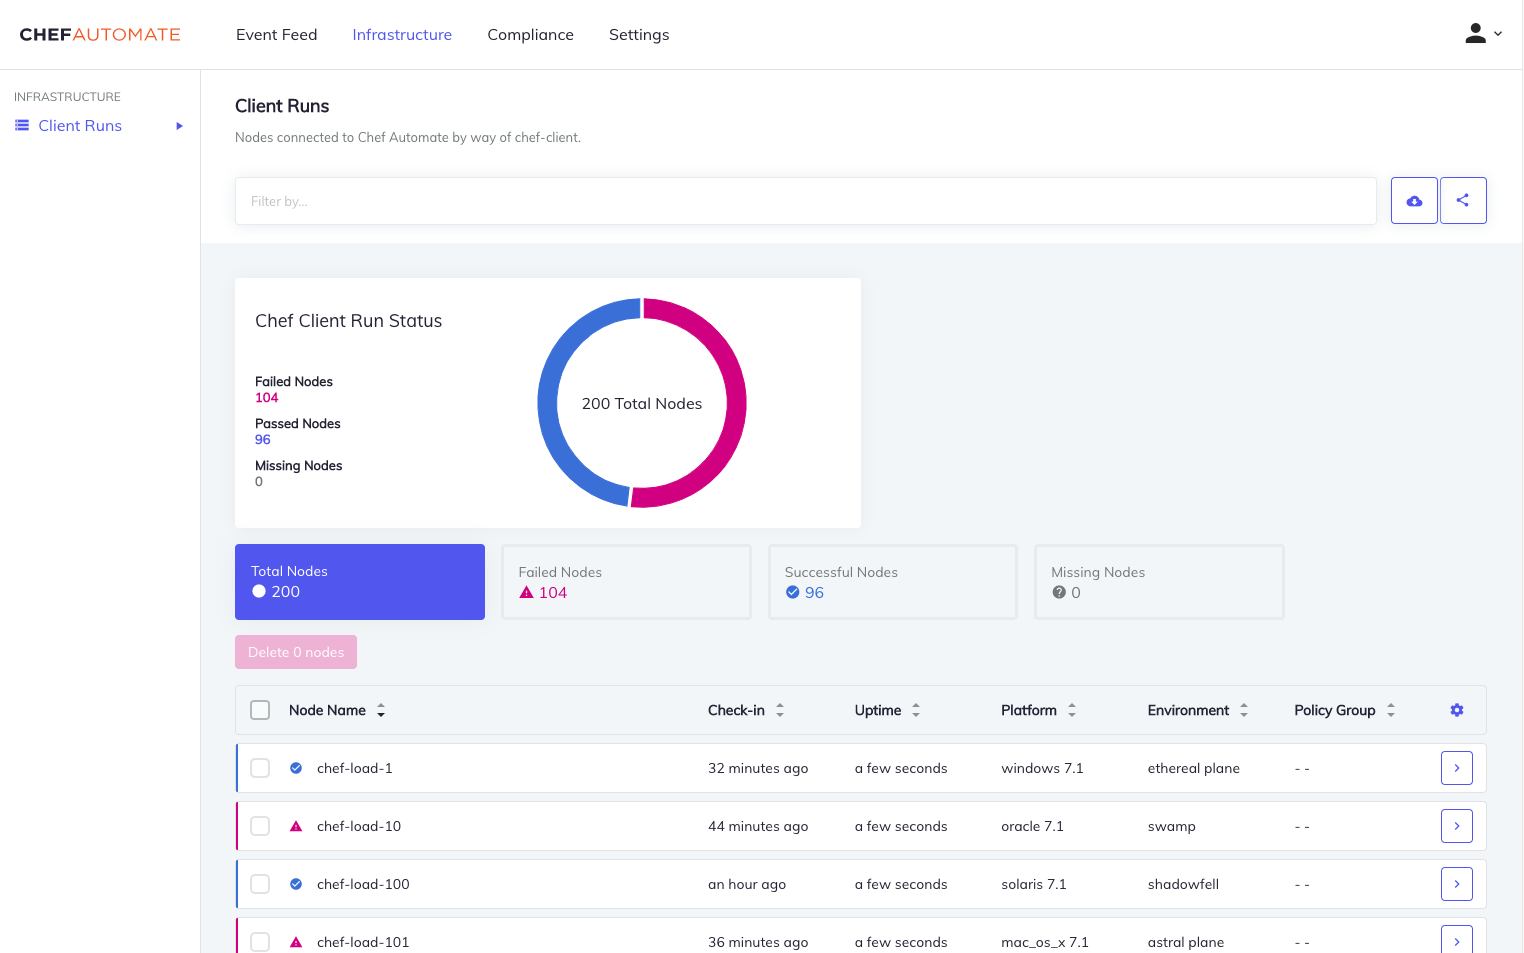
Node list table
The node list table shows all nodes connected to Chef Automate. Filter the node list table by selecting any status tabs below the Chef Infra Client Run Status box. Sort the nodes listed on the table by selecting the arrows to the right of the column headers: Node Name, Check-In, Uptime, Platform, Environment, or Policy Group. Selecting an entry in this table takes you to a Node details page with more information about the Chef Infra Client runs associated with this node. A node may be present in this table without any associated run history. This situation happens when data retention settings erase the most recent run history for such a node. In this case, a no data icon appears, and you can’t view any node details. The node remains listed as a missing node until it’s deleted from Chef Automate. Chef Automate automatically removes any nodes deleted from the Chef Infra Server.
Node details
The Node Details table displays the most recent converge results. Find more information about Resources, Run List, and Attributes in the tabs below the node detail chart. Select the tabs to switch between these three views.
Resources displays the status of the most recent resources as failed, successful, unchanged, or unprocessed. Selecting the tabs with these names filters the list to show only those resources.
Run List shows cookbooks, roles, and recipes. For a node using Policyfiles, you can see the policy IDs for each cookbook listed.
Attributes shows an expandable list of node properties. Use the search bar to discover the node attributes by attribute name, key name, or value. The search results show by highlighting matching attributes. Use the Default, Normal, Override, and Automatic buttons beneath the search bar to filter attributes by these categories. Learn more about attributes.
When looking at a failed Chef Infra Client run, select View Error Log at the top of the page to open a window showing the error message and backtrace. Use the Download button to save the error message.
Selecting a node from the node list table opens the Node details page with the most recent information about that node. To look at past run data, select Run History on the upper right of the page, which opens a side panel containing historical run data. You can filter this data using the Run Status icons and Date Range selections.
Node history data supports up to three months of Chef Infra Client run information. Scroll through the node history using the pagination buttons at the bottom of the side panel. Use the X button at the panel’s top to close the side panel.
Filter nodes
Search bar
Filter nodes from the search bar based on existing node information. You can apply more than one filter to a search. The node list table changes to display only nodes that match all applied filters. To apply a filter, first select the filter from the dropdown list and begin typing to display autocomplete options. To save a search, select Share to the right of the search bar and copy the private URL.
Node filters
- Attribute
- Search for an attribute key. This doesn’t search across attribute values.
- Chef Organization
- A Chef Infra Server organization name.
- Chef Infra Server
- A Chef Infra Server URL.
- Cookbook
- A cookbook name.
- Environment
- Nodes can have one environment.
- Node Name
- Name of the node.
- Platform
- OS Platform of a node.
- Policy Group
- Policy group name, only nodes using Policyfiles appear.
- Policy Name
- Name of the policy as set in
policyfile.rb, only nodes using Policyfiles appear. - Policy Revision
- The policy revision ID, only nodes using Policyfiles appear.
- Recipe
- A recipe within a cookbook.
- Resource Name
- A resource within a cookbook.
- Role
- Search by nodes assigned to a role. Nodes can have zero or multiple roles.
See more about Policyfiles.
Manage node data
Manage missing nodes
Configure the timing for labeling nodes as missing and then deleting them from Data Lifecycle on the Settings tab.
Delete missing nodes
If you have admin permissions or the relevant permissions defined in access policies, you can delete missing nodes from the Client Runs page. You can’t delete active nodes.
To delete one or more missing nodes, select the checkbox to the left of the node name, and then select the red Delete button above the table header. Confirm the delete action in the dialog. To delete all missing nodes, select the checkbox at the top of the Client Runs table, which selects all missing nodes on the current page. You can deselect individual nodes by clearing the checkboxes next to nodes. Select the Delete button and confirm the delete action in the dialog.
Delete missing nodes from the command line
Delete nodes using the Chef Automate CLI or the Chef Automate REST API.
To delete a node from the Client Runs page using the Chef Automate CLI, first, locate the node ID on the Node Details page, and then use this node ID with the node-delete command:
chef-automate infrastructure node-delete 3f2a2830-0ef3-474a-a835-3a7dd25361fe
To delete nodes using the REST API, use the "https://automate-url/api/v0/ingest/events/chef/nodedelete" endpoint to delete a single node, or the "https://automate-url/api/v0/ingest/events/chef/node-multiple-deletes" endpoint to delete multiple nodes.
Identify your node or nodes with either the node_id–which is the UUID of the node as it appears in Chef Automate–or the combination of node_name, organization_name, and service_hostname.
The service_hostname is the fqdn of your Chef Infra Server or the localhost of chef-solo nodes.
Delete a node using the node ID
curl -sSX POST "https://automate-url/api/v0/ingest/events/chef/nodedelete" -d
'{
  "node_id": "3f2a2830-0ef3-474a-a835-3a7dd25361fe"
}'
-H "X-Data-Collector-Token: $TOKEN"
Delete multiple nodes using the node ID
curl -sSX POST "https://automate-url/api/v0/ingest/events/chef/node-multiple-deletes" -d
'{
  "node_ids": ["3f2a2830-0ef3-474a-a835-3a7dd25361fe", "9c139ad0-89a5-44bc-942c-d7f248b155ba"]
}'
-H "X-Data-Collector-Token: $TOKEN"
Delete a node using the node name, organization name, and service hostname
curl -sSX POST "https://automate-url/api/v0/ingest/events/chef/nodedelete" -d
'{
  "node_name": "somenode",
  "organization_name": "yourorg",
  "service_hostname": "chef-infra-server-fqdn"
}'
-H "X-Data-Collector-Token: $TOKEN"
Manage ephemeral nodes
Chef Automate considers the instances of ephemeral nodes, which are nodes that are frequently created and destroyed, as new nodes by default, even if the node indefinitely uses the same name.
Set Chef Automate to consider ephemeral nodes as manifestations of the same node by configuring the UUID on the client-side. Configuring the UUID on the client-side keeps the node associated with the same ID, making Chef Automate consider it the same node every time it recreates. In the node’s client.rb, set chef_guid to the desired UUID. If the node already exists, check that it uses the correct UUID. Otherwise, it appears as a new node the next time it recreates.
See the client.rb documentation for more information about configuring your client nodes.
The following are the configuration parameters available:
| Parameter | Type | Explanation | Format | Default |
|---|---|---|---|---|
threshold | string | The duration after which unreported nodes are marked as missing. | 1h30m, 1m, 2h30m, 1d, etc. | 1d |
every | string | How often to scan the nodes to check if they’re missing. | 1h30m, 1m, 2h30m, 1d, etc. | 15m |
running | boolean | Is the job running? Set to false to turn off missing node functionality. | n/a | true |
Below is an example curl command:
curl -sSX POST "https://automate-url/api/v0/retention/nodes/missing-nodes/config" -d
'{
  "threshold": "1d",
  "every": "15m",
  "running": true
}'
-H "api-token: $TOKEN"
You need an API token to send API requests.
Configure data cleanup
Chef Automate prevents irreversible destructive operations by default by keeping deleted node history in OpenSearch unless you configure this functionality.
Chef Software recommends setting the threshold for destroying deleted node history to 1 day and running data cleanup every 15 minutes.
Available data cleanup configuration parameters:
| Parameter | Type | Explanation | Format | Default |
|---|---|---|---|---|
threshold | string | The duration after which nodes marked for deletion are removed. | 1h30m, 1m, 2h30m, 1d, etc. | 1d |
every | string | How often to scan for marked nodes for deletion and removal. | 1h30m, 1m, 2h30m, 1d, etc. | 15m |
running | boolean | Is the job running, set to true to turn on data cleanup functionality. | n/a | false |
Below is an example curl command with the recommended data cleanup settings:
curl -sSX POST "https://automate-url/api/v0/retention/nodes/delete-nodes/config" -d
'{
  "threshold": "1d",
  "every": "15m",
  "running": true
}'
-H "api-token: $TOKEN"
You need an API token to send API requests.