About Run-lists
A run-list defines all of the information necessary for Chef to configure a node into the desired state. A run-list is:
- An ordered list of roles and/or recipes that are run in the exact order defined in the run-list; if a recipe appears more than once in the run-list, Chef Infra Client won’t run it twice
- Always specific to the node on which it runs; nodes may have a run-list that’s identical to the run-list used by other nodes
- Stored as part of the node object on the Chef server
- Maintained using knife and then uploaded from the workstation to the Chef Infra Server, or maintained using Chef Automate
Run-list Format
A run-list must be in one of the following formats: fully qualified, cookbook, or default. Both roles and recipes must be in quotes, for example:
"role[NAME]"
or
"recipe[COOKBOOK::RECIPE]"
Use a comma to separate roles and recipes when adding more than one item the run-list:
"recipe[COOKBOOK::RECIPE],COOKBOOK::RECIPE,role[NAME]"
Empty Run-lists
Use an empty run-list to determine if a failed Chef Infra Client run has anything to do with the recipes that are defined within that run-list. This is a quick way to discover if the underlying cause of a Chef Infra Client run failure is a configuration issue. If a failure persists even if the run-list is empty, check the following:
- Configuration settings in the config.rb file
- Permissions for the user to both the Chef Infra Server and to the node on which a Chef Infra Client run is to take place
Knife Commands
The following knife commands may be used to manage run-lists on the Chef Infra Server.
Quotes, Windows
When running knife in Windows, a string may be interpreted as a wildcard pattern when quotes aren’t present in the command. The number of quotes to use depends on the shell from which the command is being run.
When running knife from the command prompt, a string should be
surrounded by single quotes (' '). For example:
knife node run_list set test-node 'recipe[iptables]'
When running knife from Windows PowerShell, a string should be
surrounded by triple single quotes (''' '''). For example:
knife node run_list set test-node '''recipe[iptables]'''
Import-Module chef
The Chef Infra Client 12.4 release adds an optional feature to the Microsoft
Installer Package (MSI) for Chef. This feature enables the ability to
pass quoted strings from the Windows PowerShell command line without the
need for triple single quotes (''' '''). This feature installs a
Windows PowerShell module (typically in C:\opscode\chef\modules) that
is also appended to the PSModulePath environment variable. This
feature isn’t enabled by default. To activate this feature, run the
following command from within Windows PowerShell:
Import-Module chef
or add Import-Module chef to the profile for Windows PowerShell
located at:
~\Documents\WindowsPowerShell\Microsoft.PowerShell_profile.ps1
This module exports cmdlets that have the same name as the command-line tools—chef-client, knife—that are built into Chef.
For example:
knife exec -E 'puts ARGV' """&s0meth1ng"""
is now:
knife exec -E 'puts ARGV' '&s0meth1ng'
and:
knife node run_list set test-node '''role[ssssssomething]'''
is now:
knife node run_list set test-node 'role[ssssssomething]'
To remove this feature, run the following command from within Windows PowerShell:
Remove-Module chef
run_list add
Use the run_list add argument to add run-list items (roles or recipes)
to a node.
A run-list must be in one of the following formats: fully qualified, cookbook, or default. Both roles and recipes must be in quotes, for example:
"role[NAME]"
or
"recipe[COOKBOOK::RECIPE]"
Use a comma to separate roles and recipes when adding more than one item the run-list:
"recipe[COOKBOOK::RECIPE],COOKBOOK::RECIPE,role[NAME]"
Syntax
This argument has the following syntax:
knife node run_list add NODE_NAME RUN_LIST_ITEM (options)
Options
This argument has the following options:
-a ITEM,--after ITEMAdd a run-list item after the specified run-list item.
-b ITEM,--before ITEMAdd a run-list item before the specified run-list item.
Note
Examples
The following examples show how to use this knife subcommand:
Add a role
To add a role to a run-list, enter:
knife node run_list add NODE_NAME 'role[ROLE_NAME]'
Add roles and recipes
To add roles and recipes to a run-list, enter:
knife node run_list add NODE_NAME 'recipe[COOKBOOK::RECIPE_NAME],recipe[COOKBOOK::RECIPE_NAME],role[ROLE_NAME]'
Add a recipe with a FQDN
To add a recipe to a run-list using the fully qualified format, enter:
knife node run_list add NODE_NAME 'recipe[COOKBOOK::RECIPE_NAME]'
Add a recipe with a cookbook
To add a recipe to a run-list using the cookbook format, enter:
knife node run_list add NODE_NAME 'COOKBOOK::RECIPE_NAME'
Add the default recipe
To add the default recipe of a cookbook to a run-list, enter:
knife node run_list add NODE_NAME 'COOKBOOK'
run_list remove
Use the run_list remove argument to remove run-list items (roles or
recipes) from a node. A recipe must be in one of the following formats:
fully qualified, cookbook, or default. Both roles and recipes must be in
quotes, for example: 'role[ROLE_NAME]' or
'recipe[COOKBOOK::RECIPE_NAME]'. Use a comma to separate roles and
recipes when removing more than one, like this:
'recipe[COOKBOOK::RECIPE_NAME],COOKBOOK::RECIPE_NAME,role[ROLE_NAME]'.
Syntax
This argument has the following syntax:
knife node run_list remove NODE_NAME RUN_LIST_ITEM
Options
This command doesn’t have any specific options.
Note
Examples
The following examples show how to use this knife subcommand:
Remove a role
To remove a role from a run-list, enter:
knife node run_list remove NODE_NAME 'role[ROLE_NAME]'
Remove a run-list
To remove a recipe from a run-list using the fully qualified format, enter:
knife node run_list remove NODE_NAME 'recipe[COOKBOOK::RECIPE_NAME]'
run_list set
Use the run_list set argument to set the run-list for a node. A recipe
must be in one of the following formats: fully qualified, cookbook, or
default. Both roles and recipes must be in quotes, for example:
"role[ROLE_NAME]" or "recipe[COOKBOOK::RECIPE_NAME]". Use a comma to
separate roles and recipes when setting more than one, like this:
"recipe[COOKBOOK::RECIPE_NAME],COOKBOOK::RECIPE_NAME,role[ROLE_NAME]".
Syntax
This argument has the following syntax:
knife node run_list set NODE_NAME RUN_LIST_ITEM
Options
This command doesn’t have any specific options.
Examples
None.
status
The following examples show how to use the knife status subcommand to
verify the status of run-lists.
View status, include run-lists
To include run-lists in the status, enter:
knife status --run-list
to return something like:
20 hours ago, dev-vm.chisamore.com, ubuntu 10.04, dev-vm.chisamore.com, 10.66.44.126, role[lb].
3 hours ago, i-225f954f, ubuntu 10.04, ec2-67-202-63-102.compute-1.amazonaws.com, 67.202.63.102, role[web].
3 hours ago, i-a45298c9, ubuntu 10.04, ec2-174-129-127-206.compute-1.amazonaws.com, 174.129.127.206, role[web].
3 hours ago, i-5272a43f, ubuntu 10.04, ec2-184-73-9-250.compute-1.amazonaws.com, 184.73.9.250, role[web].
3 hours ago, i-226ca64f, ubuntu 10.04, ec2-75-101-240-230.compute-1.amazonaws.com, 75.101.240.230, role[web].
3 hours ago, i-f65c969b, ubuntu 10.04, ec2-184-73-60-141.compute-1.amazonaws.com, 184.73.60.141, role[web].
View status using a query
To show the status of a subset of nodes that are returned by a specific query, enter:
knife status "role:web" --run-list
to return something like:
3 hours ago, i-225f954f, ubuntu 10.04, ec2-67-202-63-102.compute-1.amazonaws.com, 67.202.63.102, role[web].
3 hours ago, i-a45298c9, ubuntu 10.04, ec2-174-129-127-206.compute-1.amazonaws.com, 174.129.127.206, role[web].
3 hours ago, i-5272a43f, ubuntu 10.04, ec2-184-73-9-250.compute-1.amazonaws.com, 184.73.9.250, role[web].
3 hours ago, i-226ca64f, ubuntu 10.04, ec2-75-101-240-230.compute-1.amazonaws.com, 75.101.240.230, role[web].
3 hours ago, i-f65c969b, ubuntu 10.04, ec2-184-73-60-141.compute-1.amazonaws.com, 184.73.60.141, role[web].
Run-lists, Applied
A run-list will tell Chef Infra Client what to do when bootstrapping that node for the first time, and then how to configure that node on every subsequent Chef Infra Client run.
Bootstrap Operations
The knife bootstrap command is a common way to install Chef Infra
Client on a node. The default for this approach assumes that a node can
access the Chef website so that it may download the Chef Infra Client
package from that location.
The Chef Infra Client installer will detect the version of the operating system, and then install the appropriate Chef Infra Client version using a single command to install Chef Infra Client and all of its dependencies, including an embedded version of Ruby, OpenSSL, parsers, libraries, and command line utilities.
The Chef Infra Client installer puts everything into a unique directory
(/opt/chef/) so that Chef Infra Client won’t interfere with other
applications that may be running on the target machine. Once installed,
Chef Infra Client requires a few more configuration steps before it can
perform its first Chef Infra Client run on a node.
A node is any physical, virtual, or cloud device that’s configured and maintained by an instance of Chef Infra Client. Bootstrapping installs Chef Infra Client on a target system so that it can run as a client and sets the node up to communicate with a Chef Infra Server. There are two ways to do this:
- Run the
knife bootstrapcommand from a workstation. - Perform an unattended install to bootstrap from the node itself, without requiring SSH or WinRM connectivity.
The following diagram shows the stages of the bootstrap operation, and the list below the diagram describes each of those stages in greater detail.
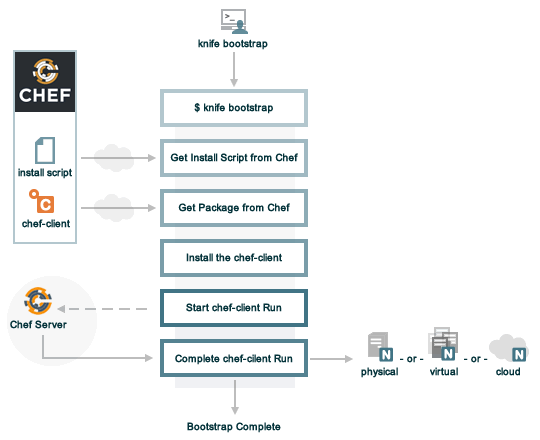
When you run knife bootstrap on a node for the first time, Chef Workstation, Infra Client, and Infra Server handle the following tasks:
Run
knife bootstrapRun the
knife bootstrapsubcommand from a workstation. Include the hostname, IP address, or FQDN of the target node as part of this command. Knife establishes an SSH or WinRM connection with the target system and runs the bootstrap script.By default, the first Chef Infra Client run has an empty run list. You can add a run list to the initial bootstrap operation using the
--run-listoption.Get the install script
A shell script gets the most recent version of the Chef Infra Client install script (
install.shorinstall.ps1) from Chef.Get the Chef Infra Client package
The install script gathers system-specific information, determines the correct package for Chef Infra Client, and downloads that package from Chef’s downloads API.
Install Chef Infra Client
Chef Infra Client is installed on the target node using a system native package (.rpm, .msi, etc).
Start a Chef Infra Client run
When you first run
knife bootstrap, Chef Workstation creates afirst-boot.jsonfile with some initial settings.On UNIX and Linux-based machines, the second shell script executes the
chef-clientbinary with thefirst-boot.jsonfile on the node.On Windows machines, the batch file that’s derived from the
windows-chef-client-msi.erbbootstrap template executes thechef-clientbinary with thefirst-boot.jsonfile on the node.Complete the Chef Infra Client run
The Chef Infra Client run proceeds using HTTPS (port 443) and registers the node with Chef Infra Server.
The Chef Infra Client Run
A “Chef Infra Client run” is the term used to describe the steps Chef Infra Client takes to configure a node when the chef-client command is run. The following diagram shows the various stages that occur during a Chef Infra Client run.

During every Chef Infra Client run, the following happens:
| Stages | Description |
|---|---|
| Get configuration data | Chef Infra Client gets process configuration data from the client.rb file on the node, and then gets node configuration data from Ohai. One important piece of configuration data is the name of the node, which is found in the node_name attribute in the client.rb file or is provided by Ohai. If Ohai provides the name of a node, it's typically the FQDN for the node, which is always unique within an organization. |
| Authenticate to the Chef Infra Server | Chef Infra Client authenticates to the Chef Infra Server using an RSA private key and the Chef Infra Server API. The name of the node is required as part of the authentication process to the Chef Infra Server. If this is the first Chef Infra Client run for a node, the chef-validator will be used to generate the RSA private key. |
| Get, rebuild the node object | Chef Infra Client pulls down the node object from the Chef Infra Server and then rebuilds it. A node object is made up of the system attributes discovered by Ohai, the attributes set in Policyfiles or Cookbooks, and the run list of cookbooks. The first time Chef Infra Client runs on a node, it creates a node object from the default run-list. A node that hasn't yet had a Chef Infra Client run won't have a node object or a Chef Infra Server entry for a node object. On any subsequent Chef Infra Client runs, the rebuilt node object will also contain the run-list from the previous Chef Infra Client run. |
| Expand the run-list | Chef Infra Client expands the run-list from the rebuilt node object and compiles a complete list of recipes in the exact order that they will be applied to the node. |
| Synchronize cookbooks | Chef Infra Client requests all the cookbook files (including recipes, templates, resources, providers, attributes, and libraries) that it needs for every action identified in the run-list from the Chef Infra Server. The Chef Infra Server responds to Chef Infra Client with the complete list of files. Chef Infra Client compares the list of files to the files that already exist on the node from previous runs, and then downloads a copy of every new or modified file from the Chef Infra Server. |
| Reset node attributes | All attributes in the rebuilt node object are reset. All attributes from attribute files, Policyfiles, and Ohai are loaded. Attributes that are defined in attribute files are first loaded according to cookbook order. For each cookbook, attributes in the default.rb file are loaded first, and then additional attribute files (if present) are loaded in lexical sort order. If attribute files are found within any cookbooks that are listed as dependencies in the metadata.rb file, these are loaded as well. All attributes in the rebuilt node object are updated with the attribute data according to attribute precedence. When all the attributes are updated, the rebuilt node object is complete. |
| Compile the resource collection | Chef Infra Client identifies each resource in the node object and builds the resource collection. Libraries are loaded first to ensure that all language extensions and Ruby classes are available to all resources. Next, attributes are loaded, followed by custom resources. Finally, all recipes are loaded in the order specified by the expanded run-list. This is also referred to as the compile phase. |
| Converge the node | Chef Infra Client configures the system based on the information that has been collected. Each resource is executed in the order identified by the run-list, and then by the order in which each resource is listed in each recipe. Each resource defines an action to run, which configures a specific part of the system. This process is also referred to as convergence. This is also referred to as the execution phase. |
Update the node object, process exception and report handlers | When all the actions identified by resources in the resource collection have been done and Chef Infra Client finishes successfully, then Chef Infra Client updates the node object on the Chef Infra Server with the node object built during a Chef Infra Client run. (This node object will be pulled down by Chef Infra Client during the next Chef Infra Client run.) This makes the node object (and the data in the node object) available for search. Chef Infra Client always checks the resource collection for the presence of exception and report handlers. If any are present, each one is processed appropriately. |
| Get, run Chef InSpec Compliance Profiles | After the Chef Infra Client run finishes, it begins the Compliance Phase, which is a Chef InSpec run within the Chef Infra Client. Chef InSpec retrieves tests from either a legacy audit cookbook or a current InSpec profile. |
| Send or Save Compliance Report | When all the InSpec tests finish running, Chef InSpec checks the reporting handlers defined in the legacy audit cookbook or in a current InSpec profile and processes them appropriately. |
| Stop, wait for the next run | When everything is configured and the Chef Infra Client run is complete, Chef Infra Client stops and waits until the next time it's asked to run. |